Using Submittals
Last updated: April 24, 2026
Overview
Submittals help project teams collect, review, and approve documents like shop drawings, product data, samples, and other materials before work begins—ensuring everyone agrees on what will actually be installed in the field.
In Constructable, submittals move through a structured workflow where teams can draft requests, assign review stages, collect approvals, and distribute final documents once they’re approved. This article walks through how to create, manage, review, and close submittals from start to finish.
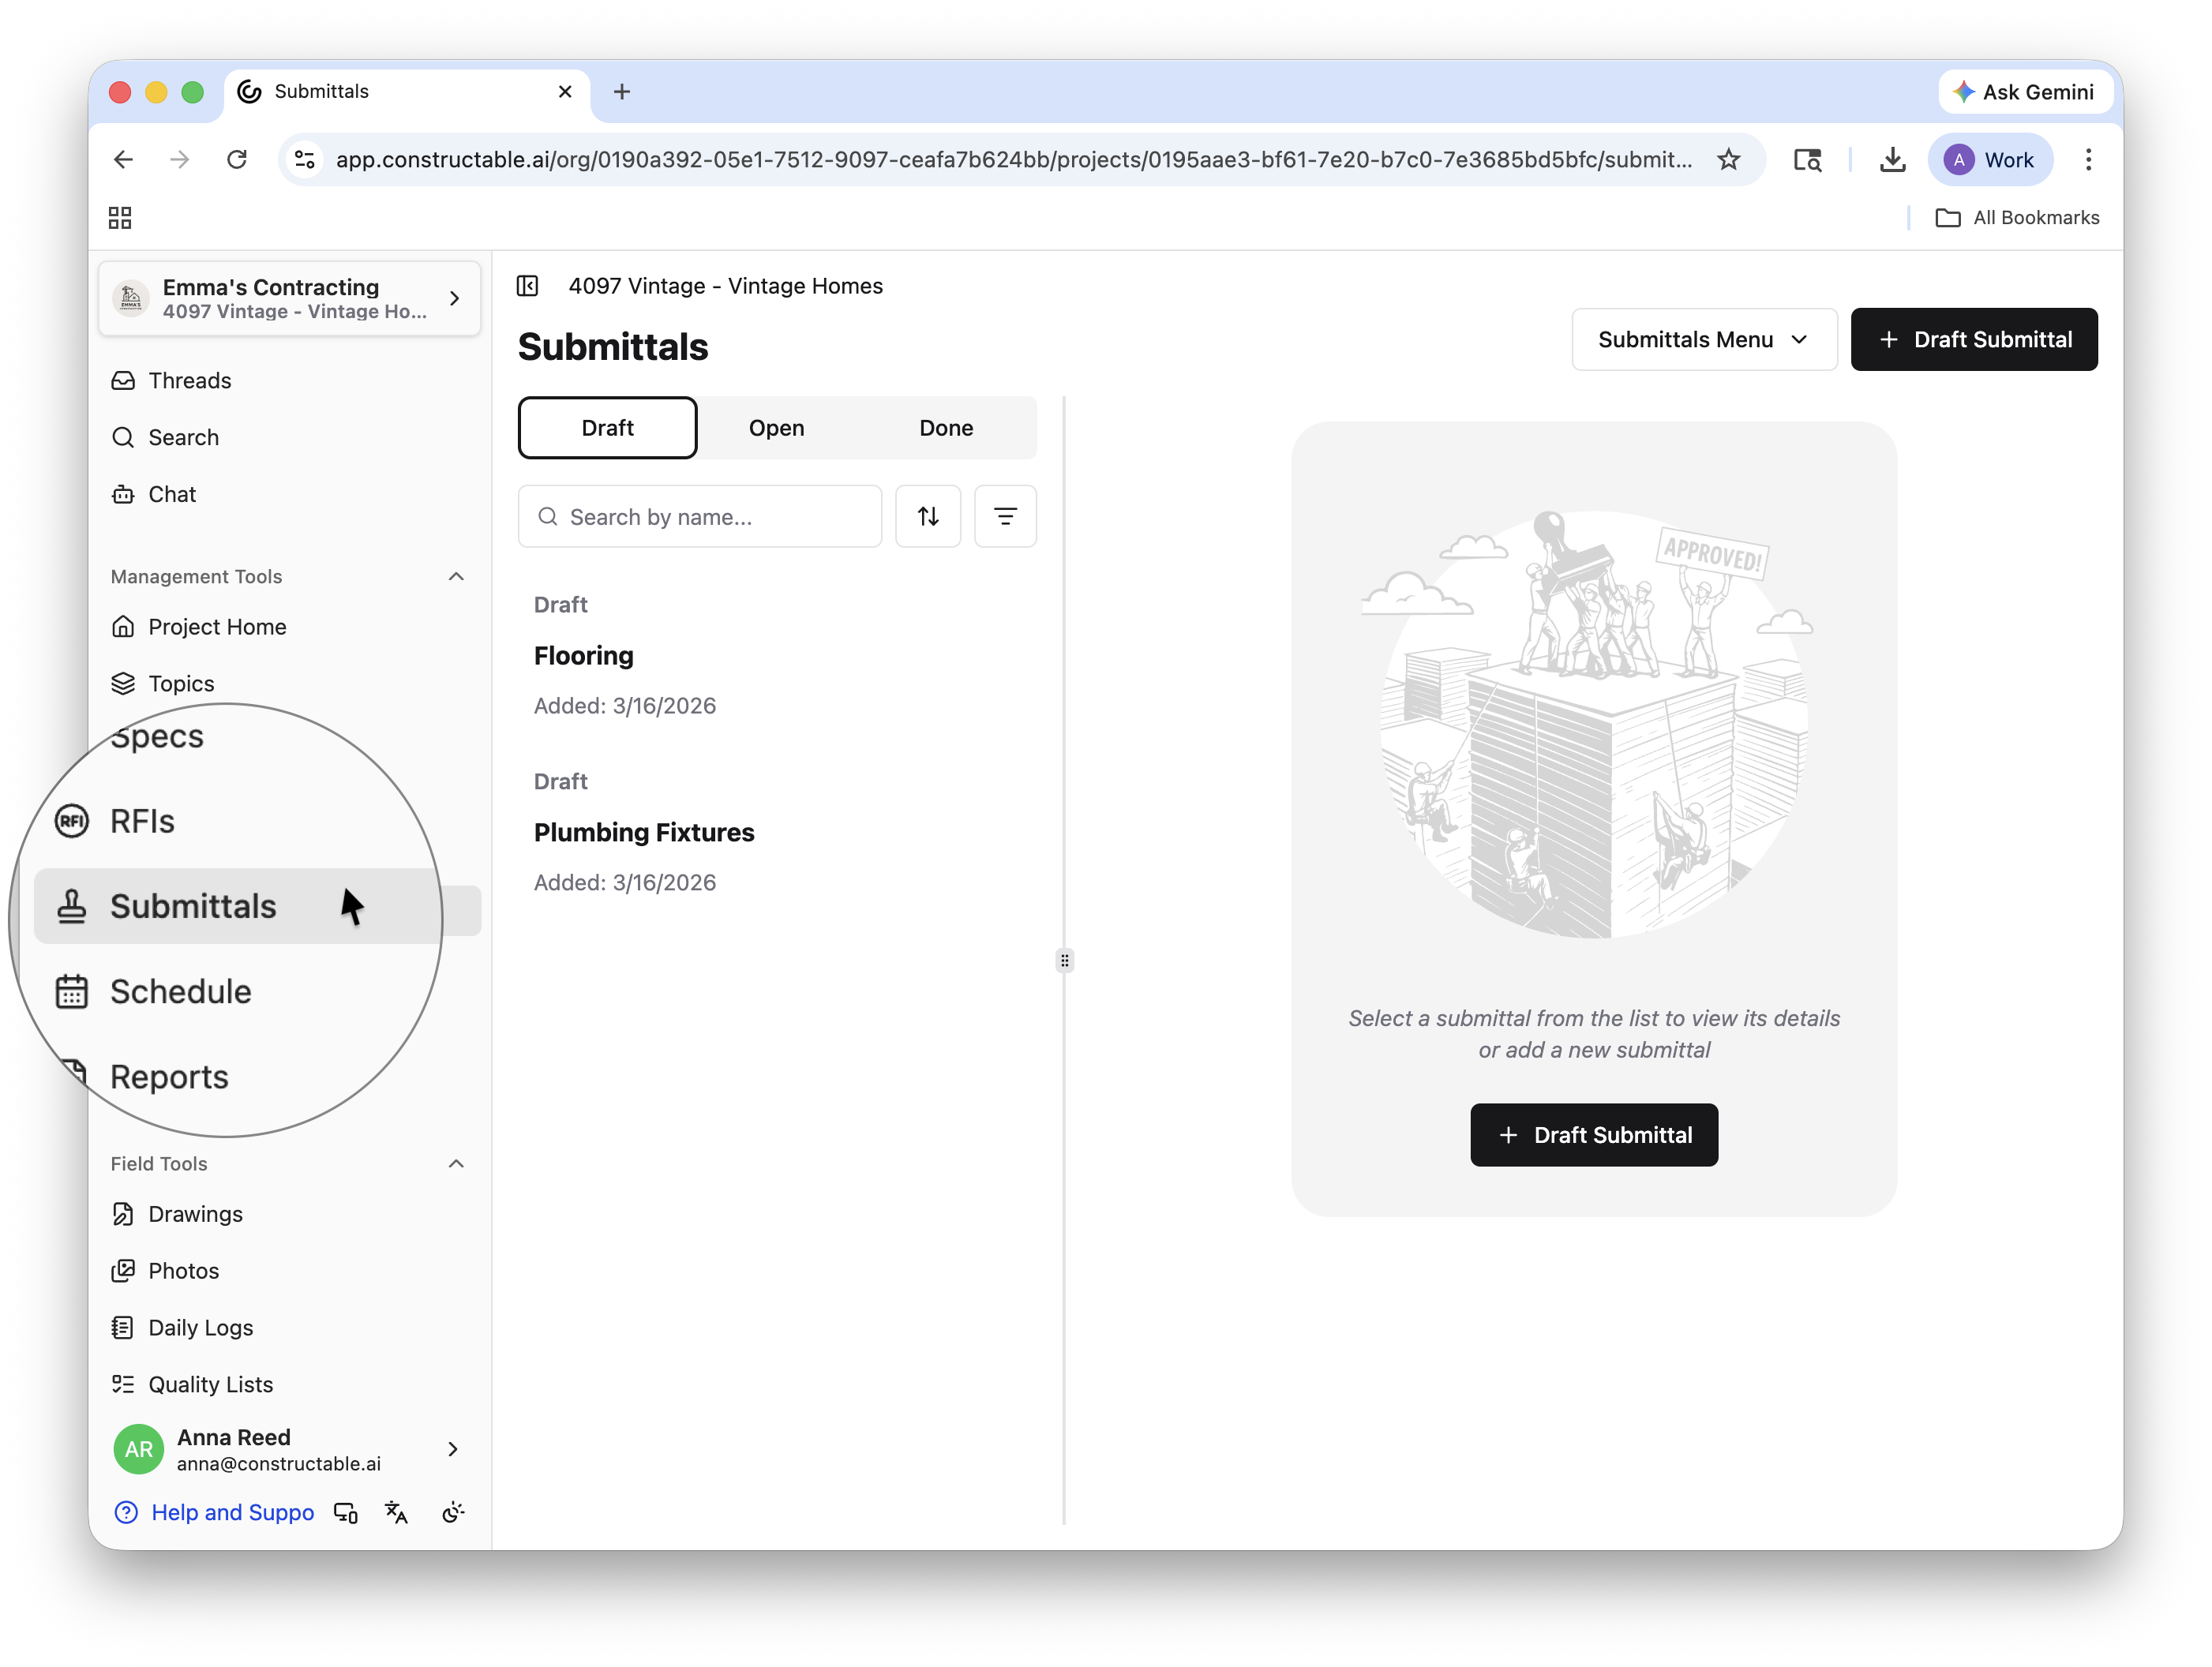
Drafting a Submittal
To create a new submittal, click the + Draft Submittal button in the upper-right corner of the page. Give the submittal a name, pick the package/category it belongs in, and select Create Draft. (Don't worry, you can always change the name later!) This will open your newly drafted submittal—from here, fill out all pertinent information fields.
In the Overview section, you can see or edit information related to the following fields:
Package/Category: Select which package or category the submittal belongs in
Submittal Type: Select the type of submittal from our list of options: Documents, Other, Plans, Product Details, Samples, or Shop Drawings
Final Due Date: This can only be seen, not edited, in the Overview section—to add or change the final due date, see the Approvals section
Responsible Contractor: Assign the proper contractor in charge of the submittal
Submittal Manager: This will default to the creator of the submittal, but can be changed
Approvers: This can only be seen, not edited, in the Overview section—to add or change the approver, see the Approvals section
Subscribers: Other members on the project who may need access to the submittal
Ball-In-Court: Who is responsible for the task at hand
The Description section allows you to provide information about the submittal and any relevant documents.
The Approvals section allows the submittal manager to + Add Stage(s), due dates, and approver(s), with the option to require all listed approvers to respond before the submittal can be closed.
Comments compiles all comments relating to the submittal for quick access.
Note: All of this information can be added or edited after the submittal is opened as well. To ensure the smoothest submittal process, we recommend filling out as much information as possible before opening, but this is not required.
Opening a Submittal
Once you save all the important information, you can open the submittal by selecting the Open Submittal button.
All open submittals are organized with your ball-in-court assignments at the top, so the most pressing and relevant tasks stay at the top of your mind.
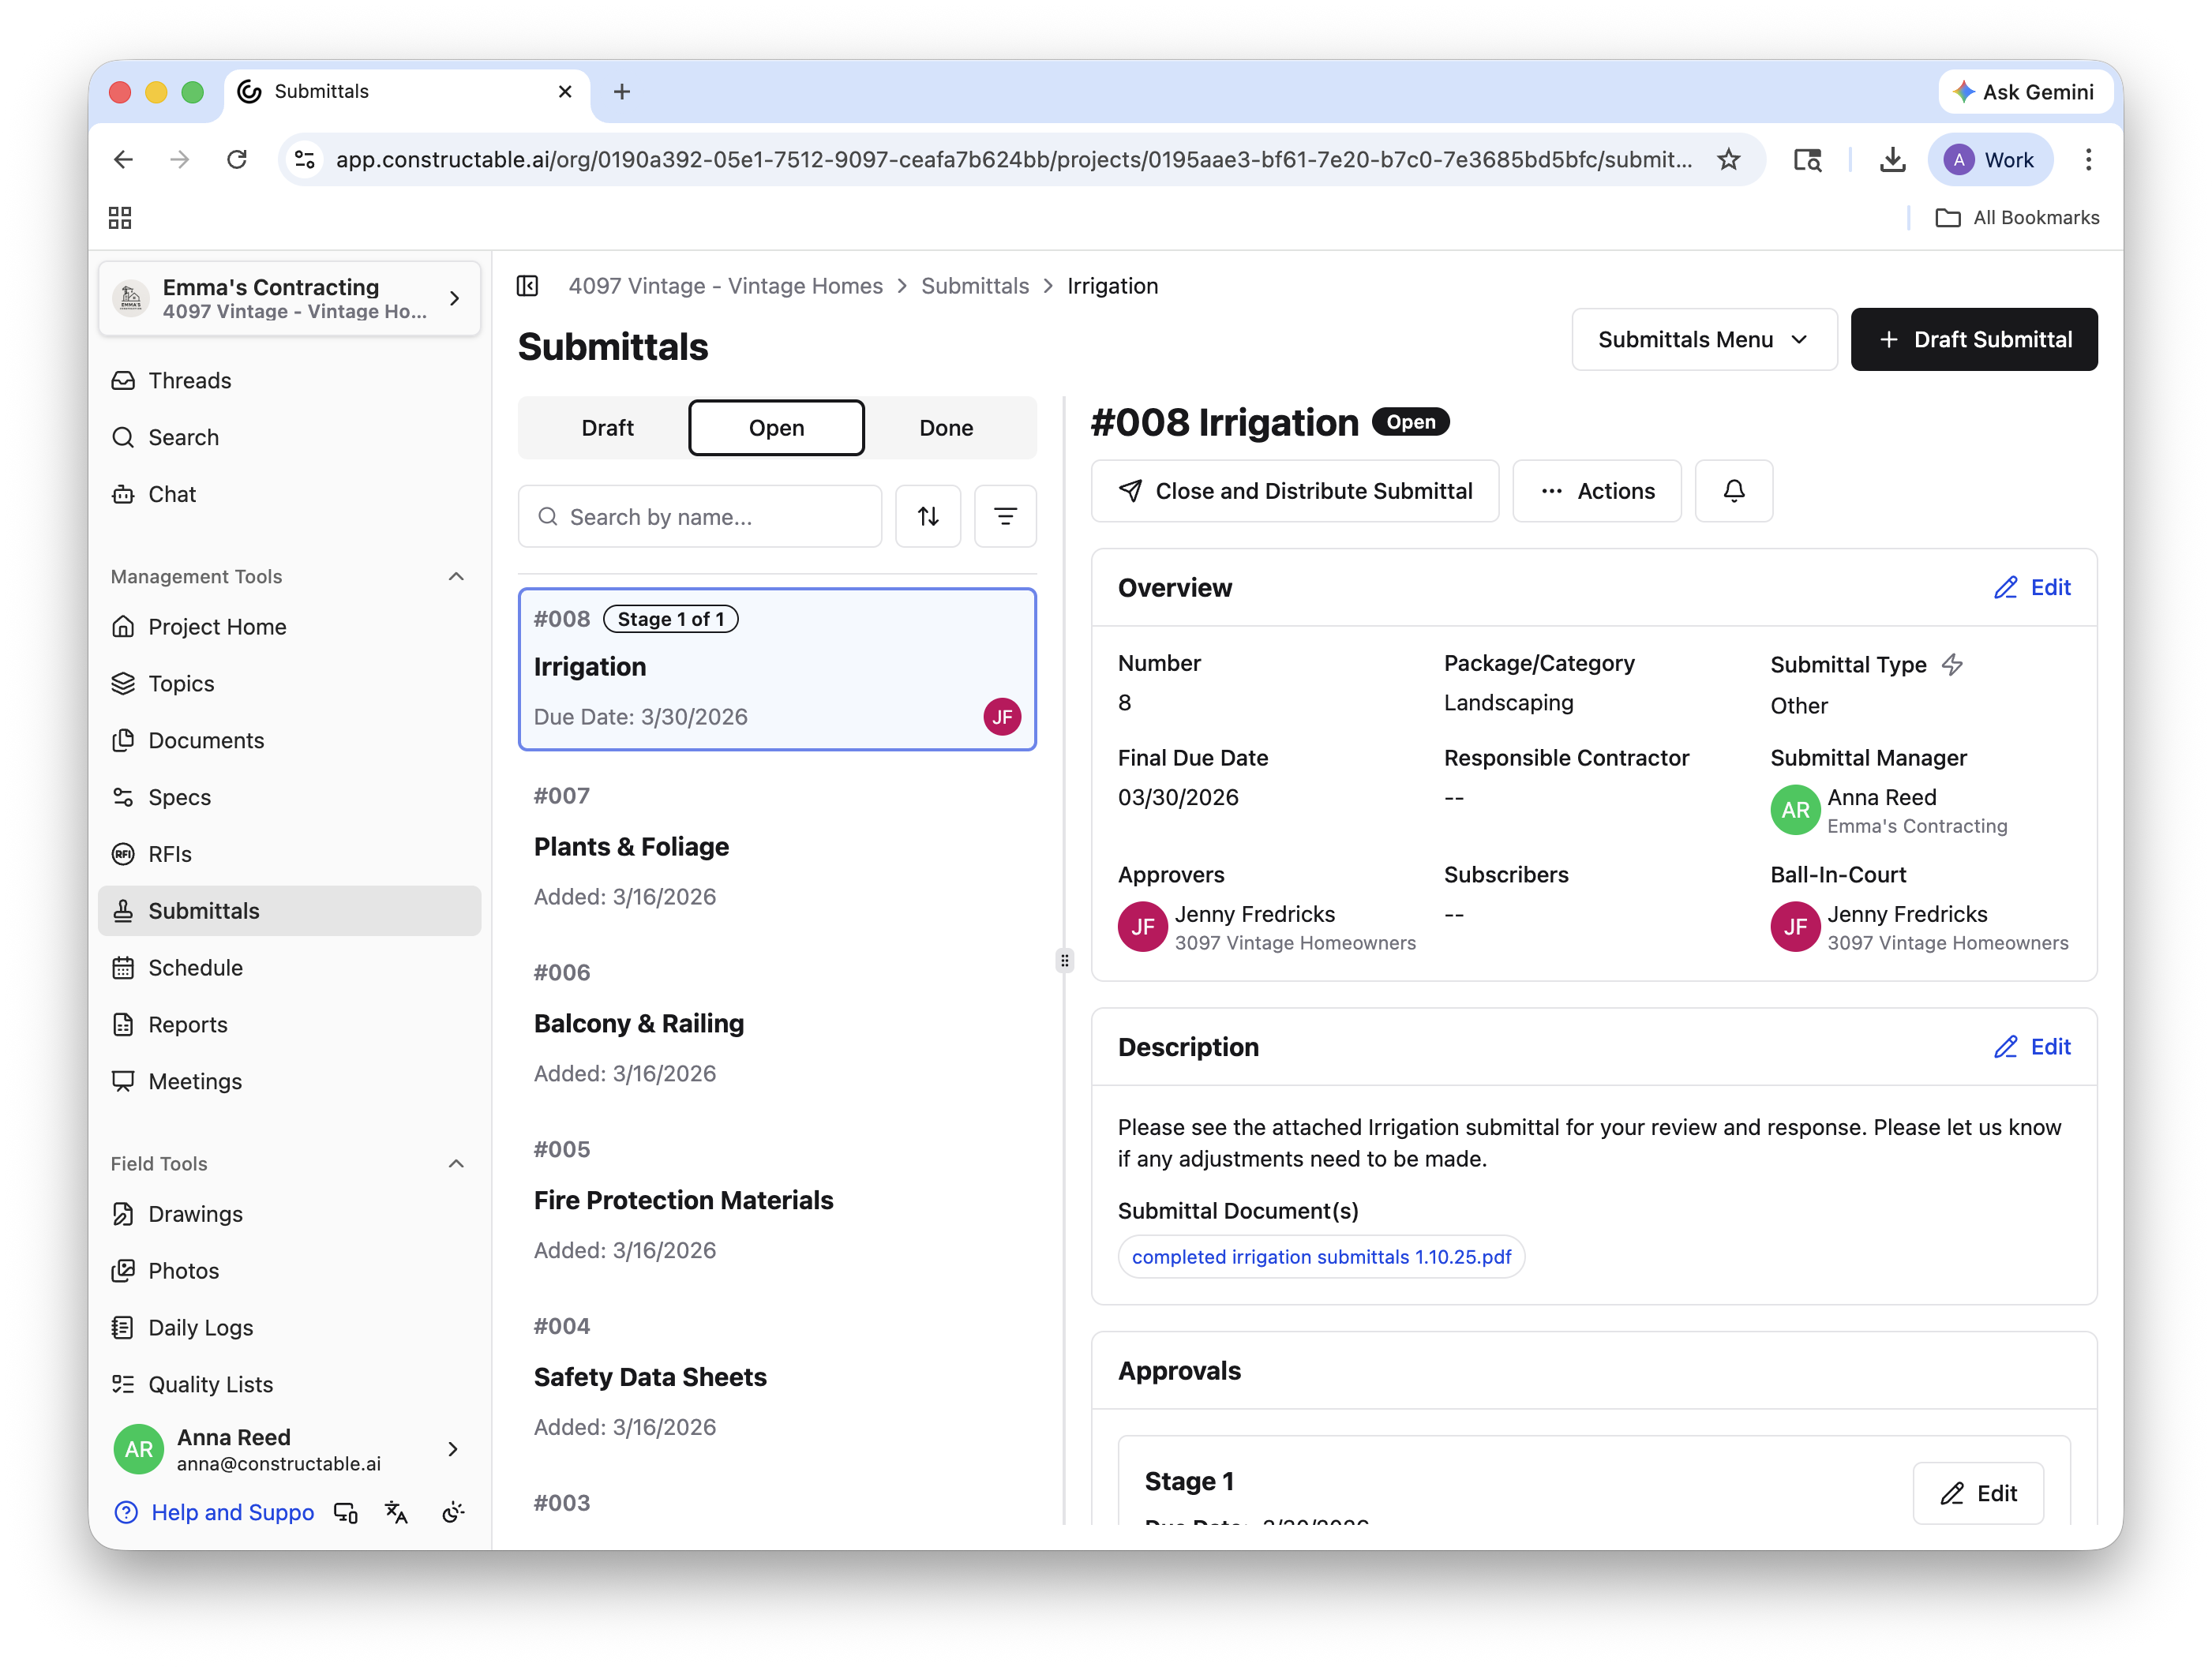
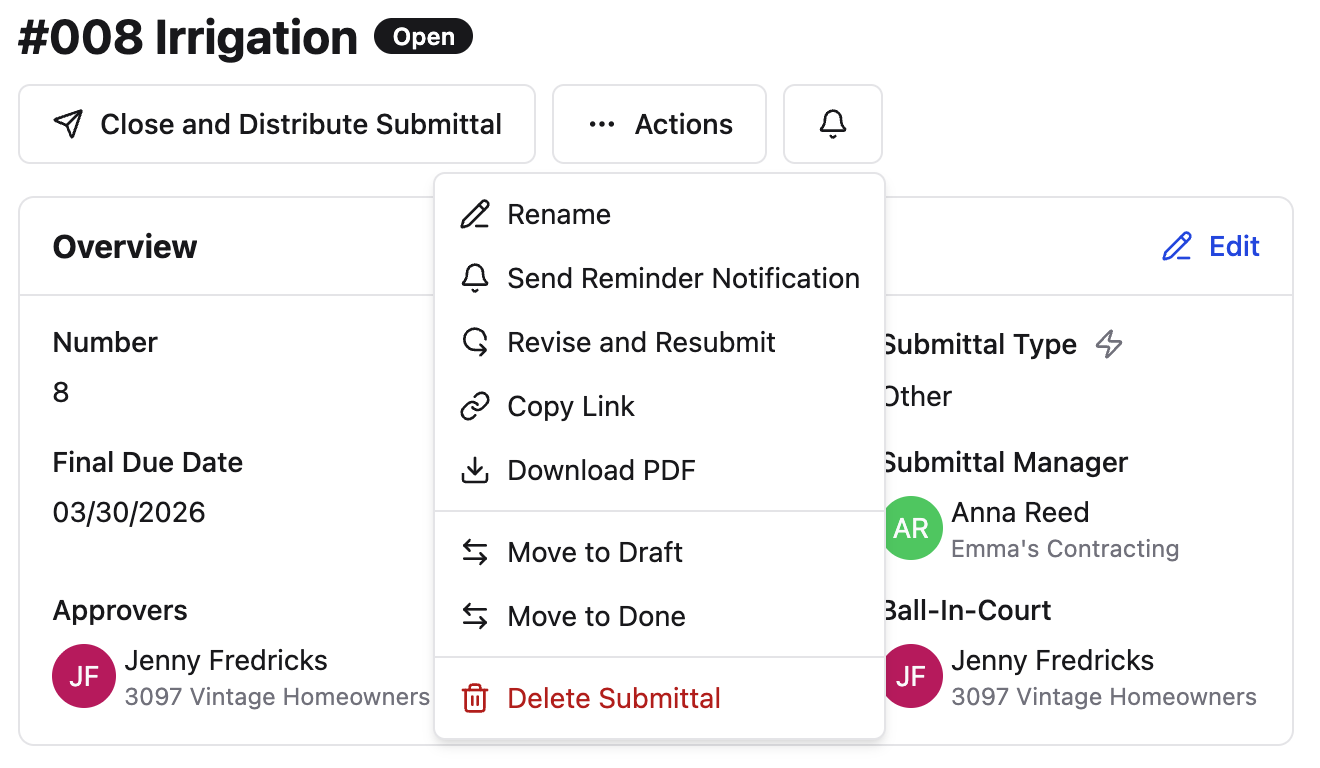
If you select a submittal and click Actions, you can Rename, Send Reminder Notification, Revise and Resubmit, Copy Link, Download PDF, Move to Draft, Move to Done, and Delete Submittal.
Note: To bulk download all submittals, click Submittals Menu > Bulk Export All Submittals at the top of the page.
To respond or approve a submittal, scroll to the Approvals section and select Respond. The approver must choose a response from the provided selections and may include any attachments or comments with the response. Don't forget to Save!
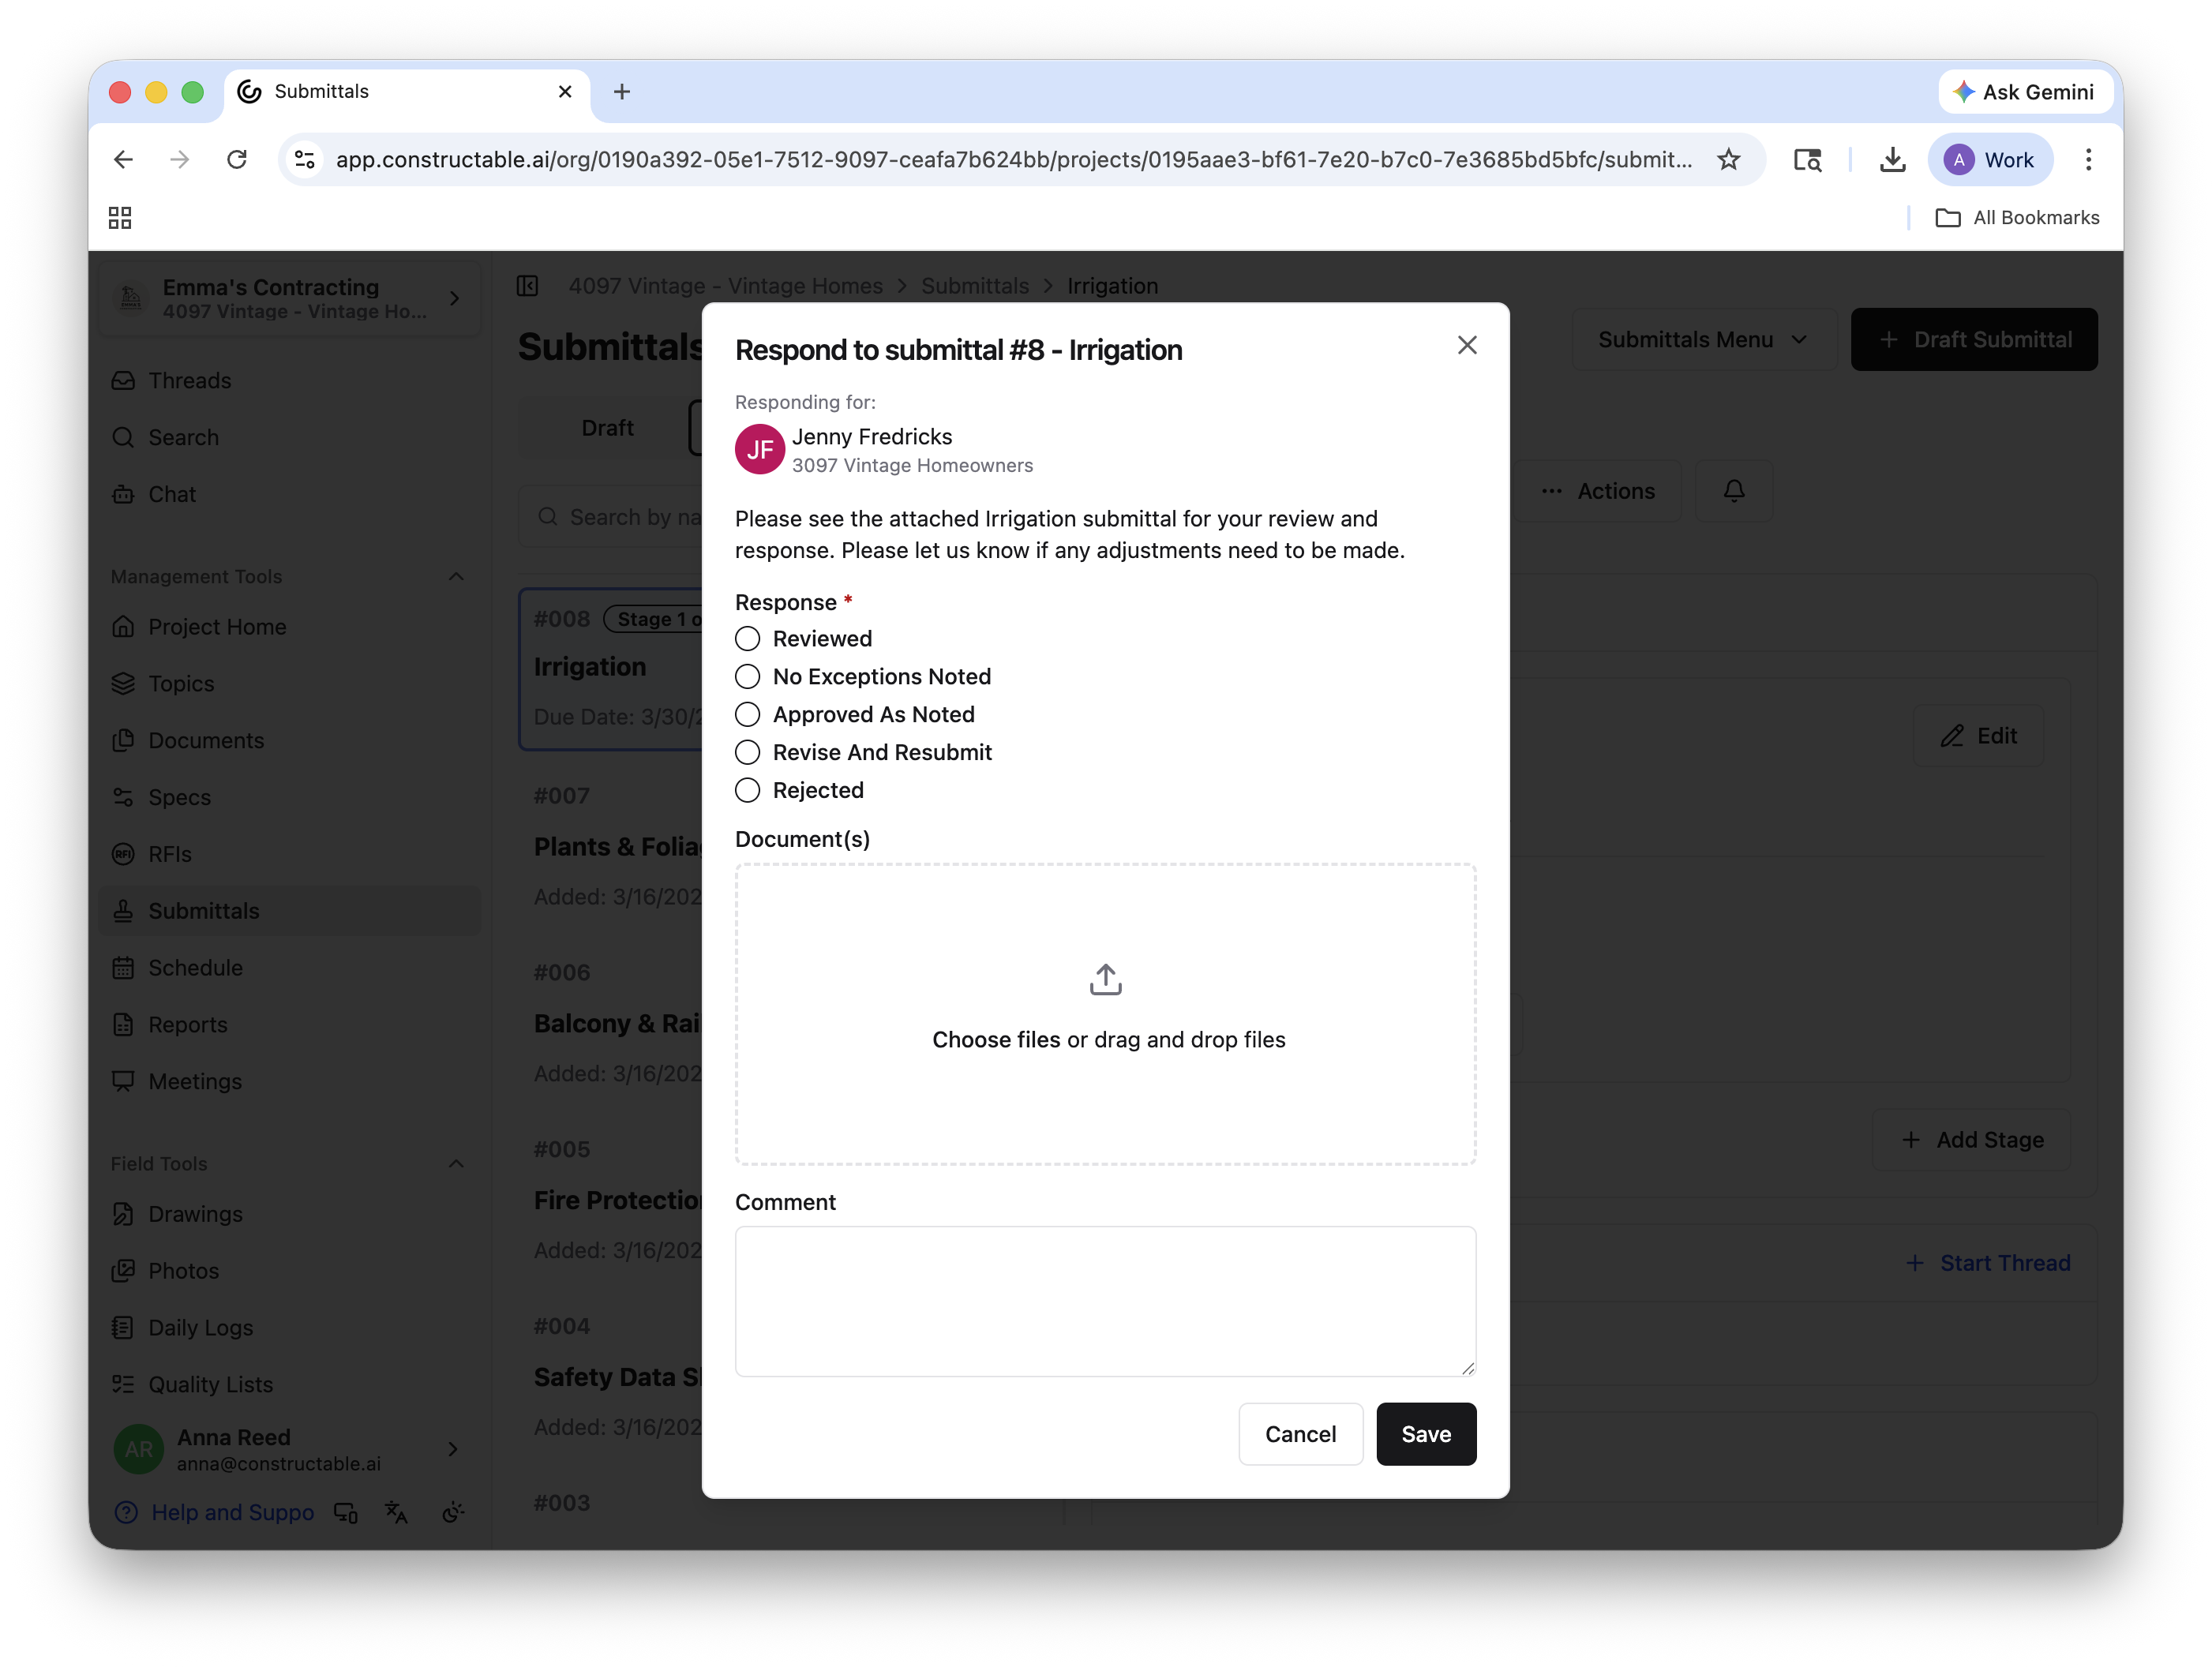
Note: The submittal manager can Respond for Approver from the Approvals section. Other users in your organization may also have access to this feature, depending on your 📄 Roles and Permissions. If you have questions about your permissions, we encourage you to first reach out to your Manager or Admin.
A response can be changed as long as the submittal is open by selecting Change Response in the Approvals section.
Closing a Submittal
Once all required responses have been collected, click Close and Distribute Submittal. This will trigger the first of 3 steps required to officially close the submittal out.
Step 1: Choose which Submittal attachments should be distributed. These attachments will appear at the top of the closed Submittal for download.
Step 2: Choose who should receive the Submittal Distribution notification. By default, the responsible contractor, plus any subscribers/approvers outside of your organization, are pre-selected.
Step 3: Review and confirm the Submittal Distribution settings and add your Distribution Message to be included in the notification email. Navigate back to prior steps if you need to make changes. Once everything looks good, click Close and Distribute.
Pro Tip: Use our AI to Autofill Message! Autofill helps get you started faster by generating a suggested draft. As with any draft, take a moment to review before sending to make sure it reflects your intent!
All closed submittals will be labeled Done and Distributed and will include all attached documents at the top for quick access. The option to Redistribute Submittal is always available at the top of closed submittals.
Table View vs. Panel View
The above photos and videos were all in Panel View. To switch to Table View, select the Submittals Menu dropdown and then Switch to Table View.
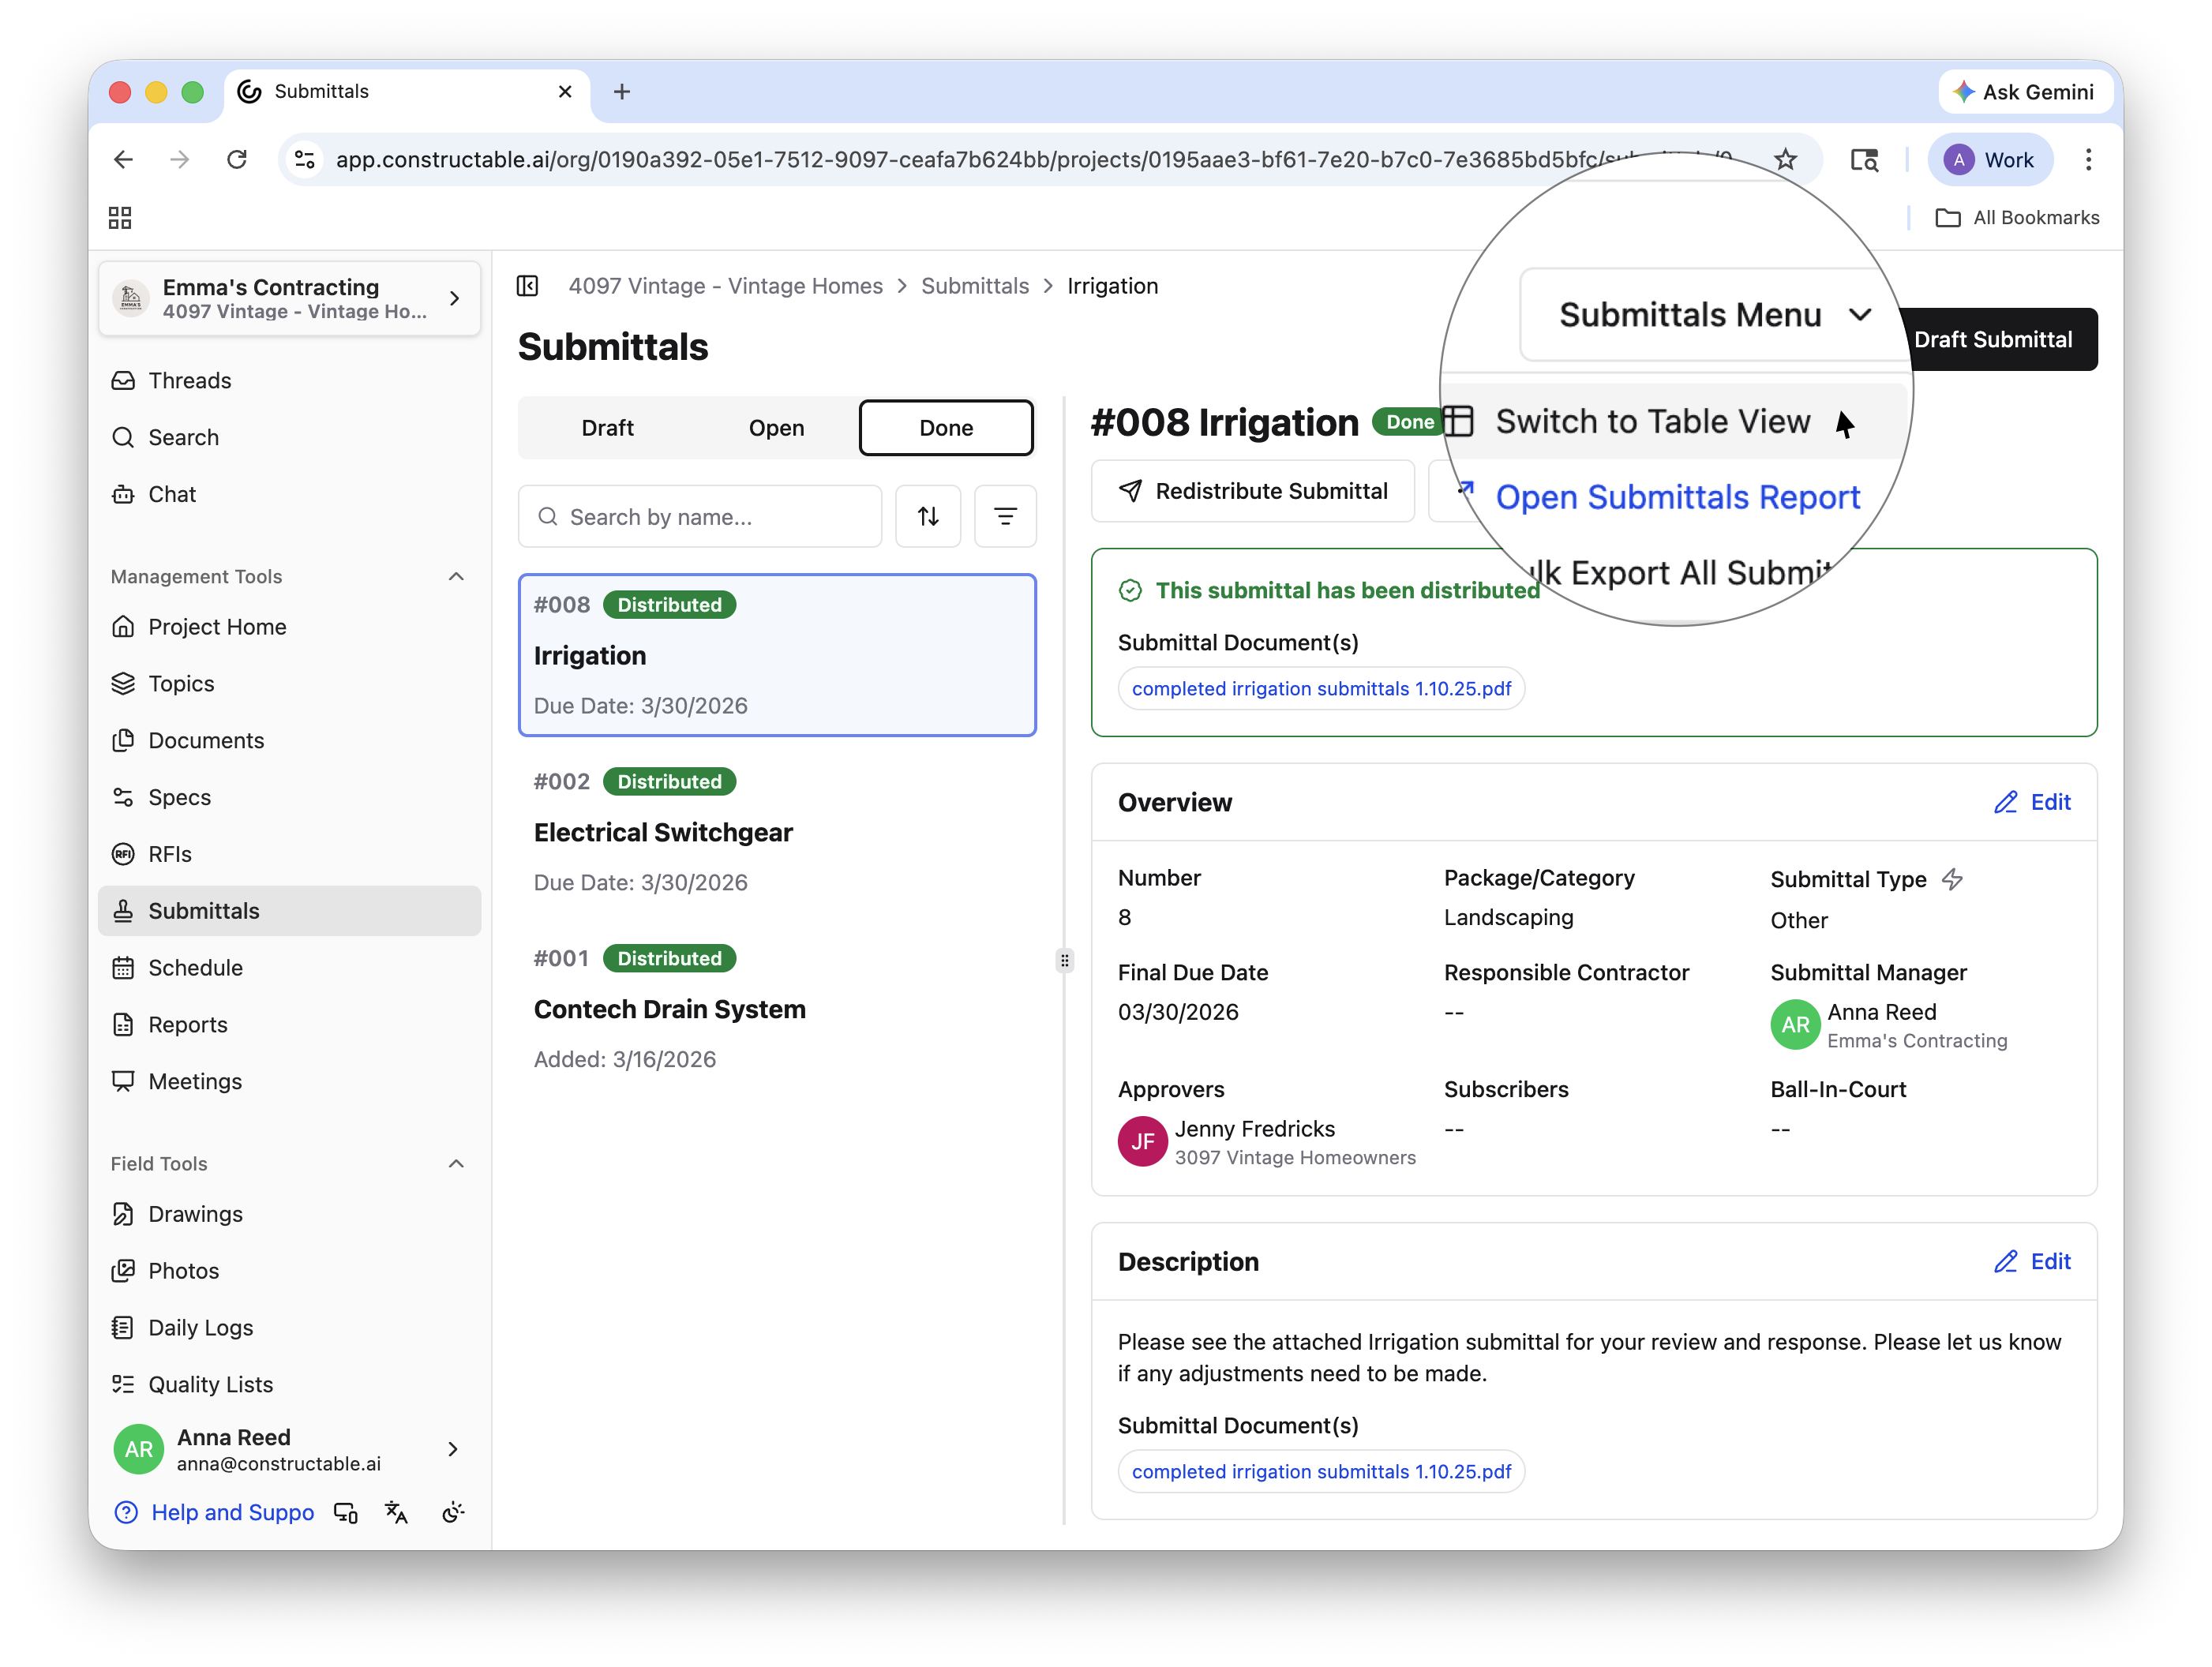
Table View lets you view all submittals (drafted, opened, or closed) in a single list. You can select the information displayed, filter, and group all submittals in a number of different ways.
Note: Whichever view you exit the Submittals workflow in will be the default view the next time you open the workflow. No need to keep switching to your preferred view!
Table View also allows users to make bulk edits to submittals. Simply select the desired submittals on the left, then select the Actions dropdown, and make your changes. This is also where you can Download Table as PDF or CSV.
Submittals Settings
If you'd like to customize how your submittals are organized, change naming conventions, or create a default subscriber list, we've got you covered! From the Submittals home page, click Submittals Menu > Submittals Settings. The way your submittals are numbered can be updated from the first box. Just click Edit and toggle on or off how you'd prefer your team to read submittals.
See how many submittals fall under each package/category, add new ones, and edit existing ones in the next box.
Finally, if you'd like to create a default subscriber list—i.e., people on your team who will automatically get access to newly created submittals—scroll to the last box, and click Edit under "Default Submittal Subscribers." Search or select the members of your team who you want to give automatic access to, then click Save. You can update this list at any time, repeating the steps outlined here.
And just like that, your submittals move from draft to approved—keeping documentation clear, organized, and accessible to the whole project team.
Frequently Asked Questions
Can I edit a submittal after it has been opened?
Yes. Most fields—including description, responsible contractor, subscribers, and approval stages—can still be edited after the submittal is opened. However, it's recommended to fill out as much information as possible before opening to keep the review process running smoothly.
What happens if an approver needs to change their response?
Responses can be changed while the submittal is still open. Simply navigate to the Approvals section and select Change Response.
Can I resent a submittal after it has been distributed?
Yes. Closed submittals can be redistributed at any time by selecting Redistribute Submittal at the top of the submittal page.
What's the difference between Panel View and Table View?
Panel View focuses on reviewing and managing one submittal at a time, while Table View allows you to see and manage all submittals in a single list. Table View is especially helpful for filtering, grouping, and making bulk edits.