Using Topics
Last updated: February 7, 2026
Overview
Topics act as containers for markups and comments, allowing teams to group related drawing feedback and conversations in one place—even across multiple sheets.
Topics can be created and managed in multiple places, and while they live in their own workflow, they’re most often created and interacted with while actively reviewing drawings.
This article walks through the different ways to create topics, how to add markups and comments to them, how sharing and visibility work, and how to manage topics once they’re in use.
How To Create a Topic
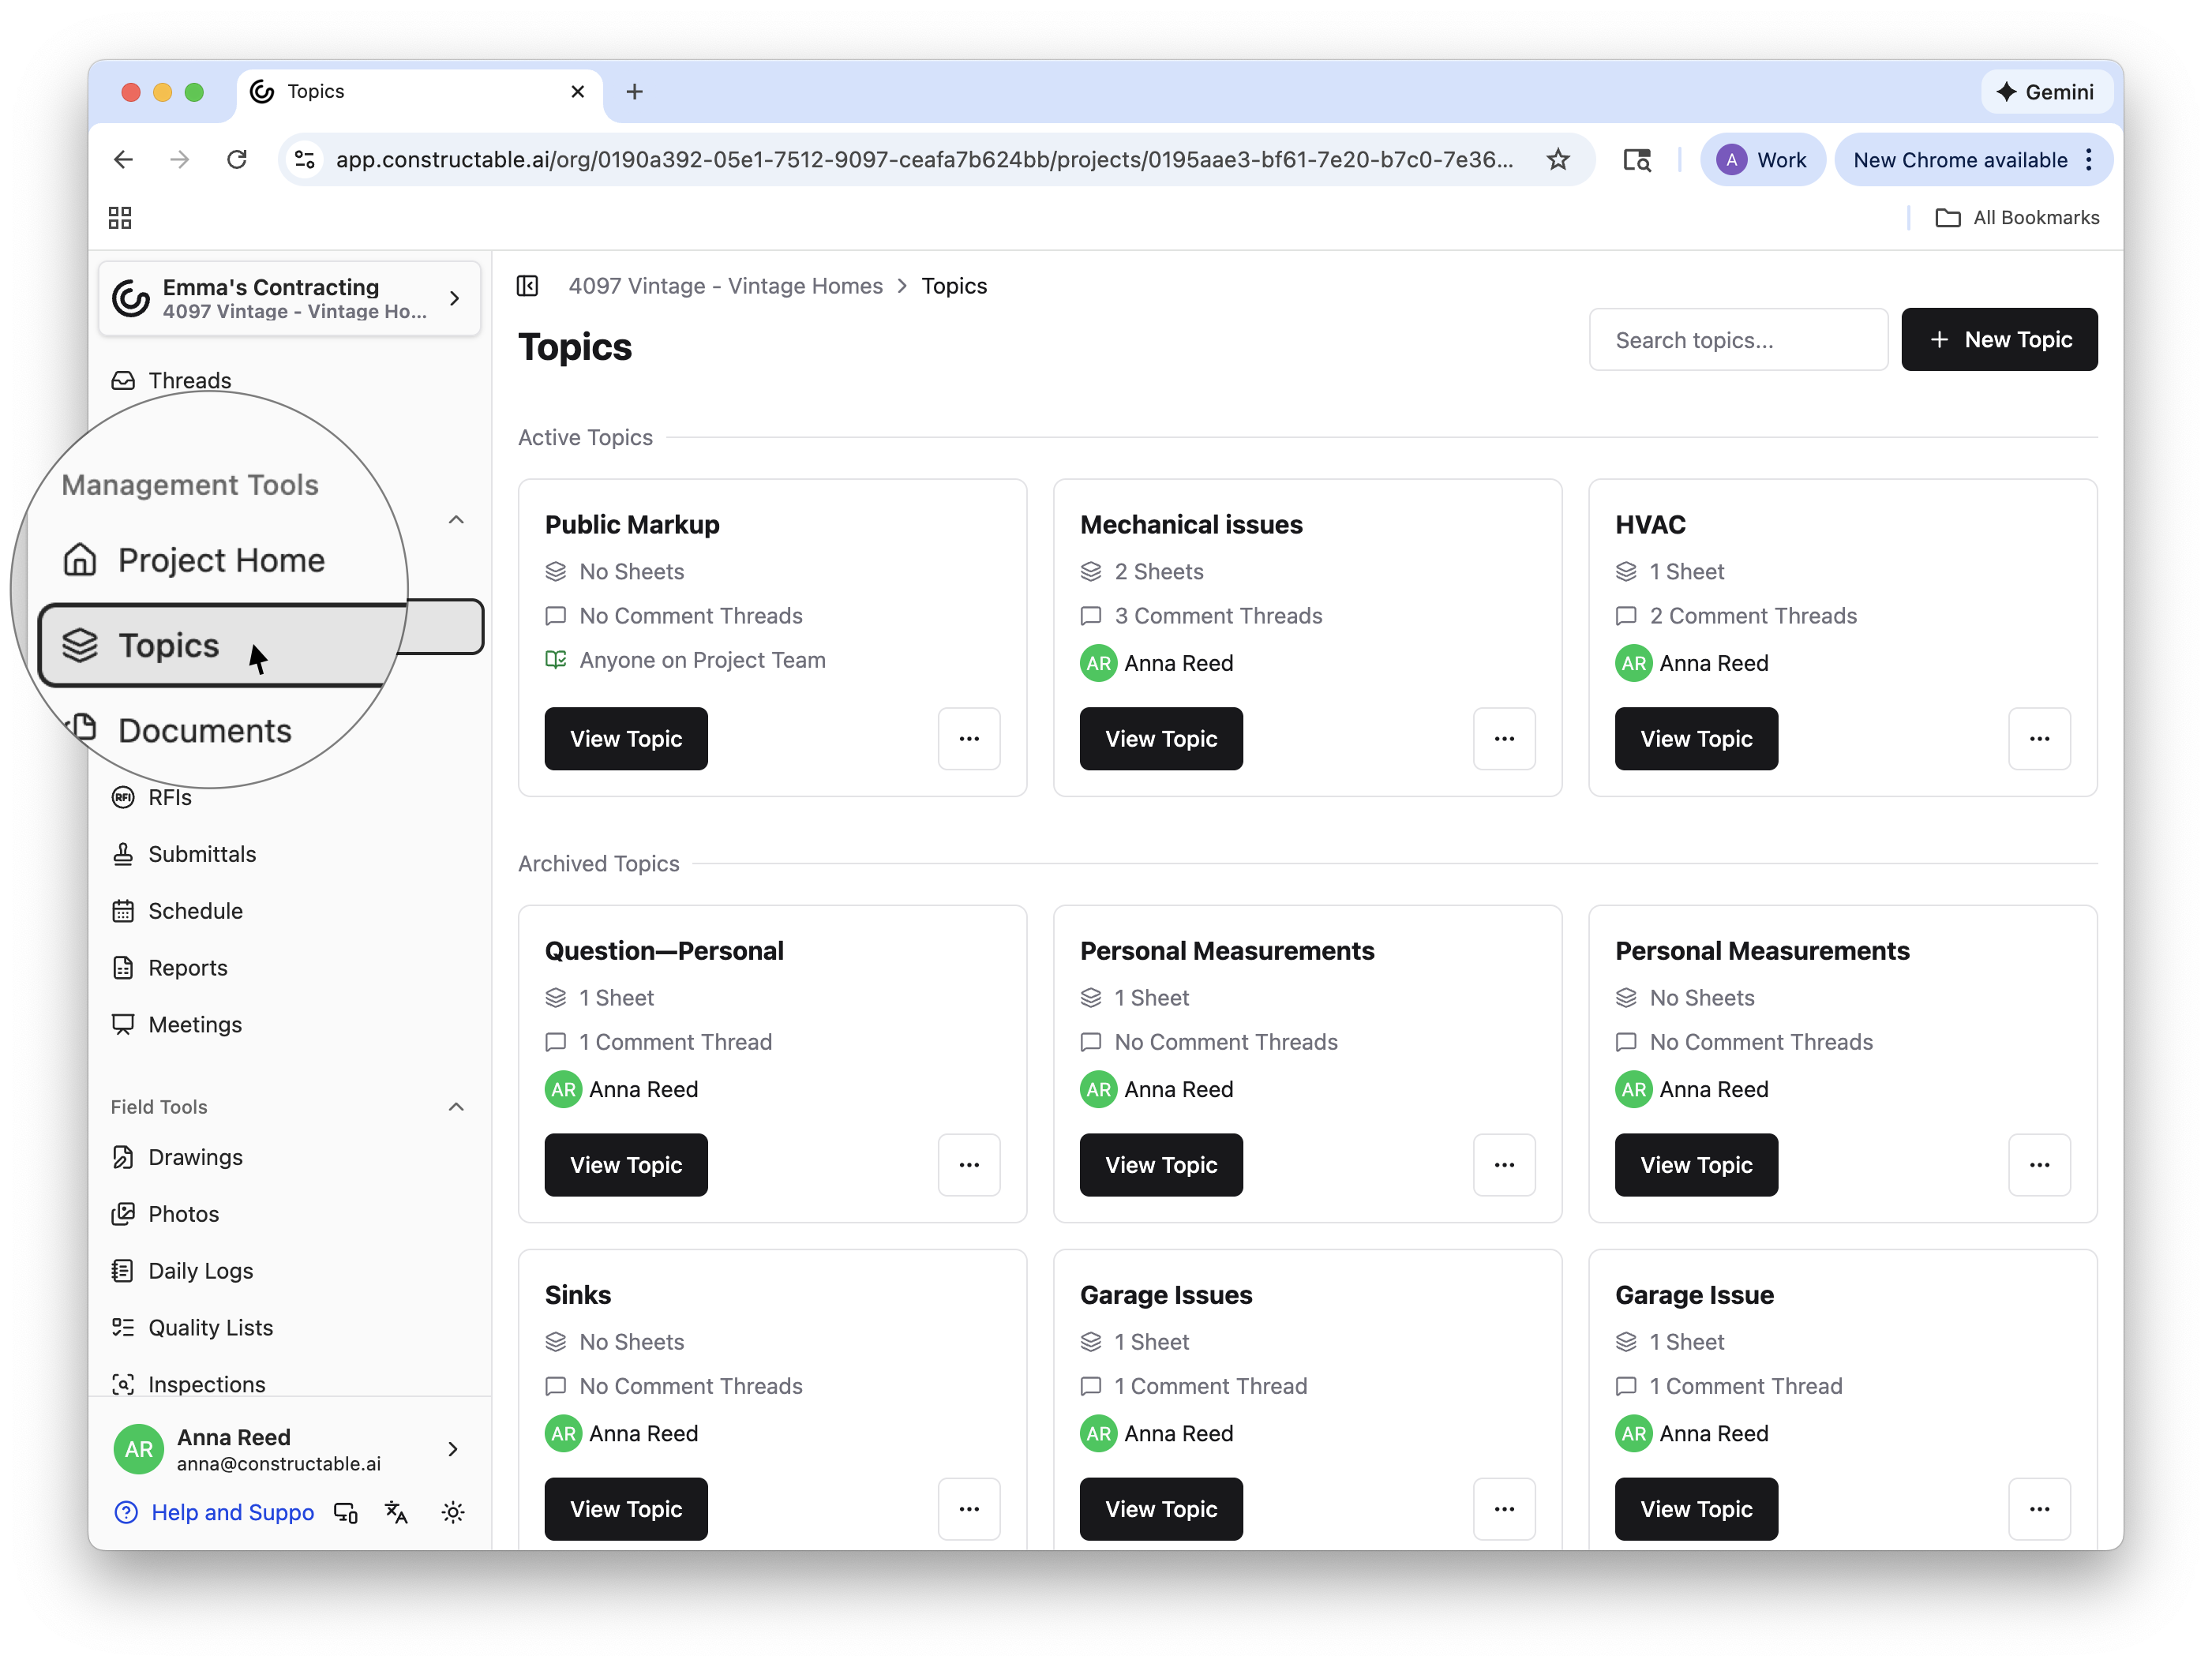
There are a few ways to create a new topic—either through the Topics workflow or, even more efficiently, directly within the drawing viewer while reviewing sheets.
Topics Workflow
To create a new topic from the Topics workflow, select + New Topic in the upper right corner, title your new topic, and then click Create. This will automatically open the overview for that topic, which will be empty. To add markups and comments to your new topic, open a sheet in the drawing viewer, add a markup, and then click Save > Add to Existing Topic > Select a topic > Add to Topic.
The Topics workflow is more often used to manage topics, so the most efficient way to create new ones is directly in our drawing viewer.
Note: Any topic created this way defaults to private, meaning only you can access it. See: Managing Topics section below for how to adjust accessibility preferences and share a topic with others.
Drawing Viewer: Draft Mode
You can add markups to a sheet while not being in a topic in Draft Mode. Draft Mode allows you to decide how (or if) your markups should be saved before sharing them with others. If you don’t want to save any of these markups, there’s no need to add them to a topic—either exit the drawing viewer and select Discard and Exit, select them and Delete, or select Discard at the top of the drawing viewer.
But, if you’d like to share your markups with others, or save them for your own notes, select Save. A pop-up menu will appear where you can select from four options:
Save Privately: All topics saved to this option will go into a personal topic that only you have access to. If you want to create personal markups, for your eyes only, this is the place to save them!
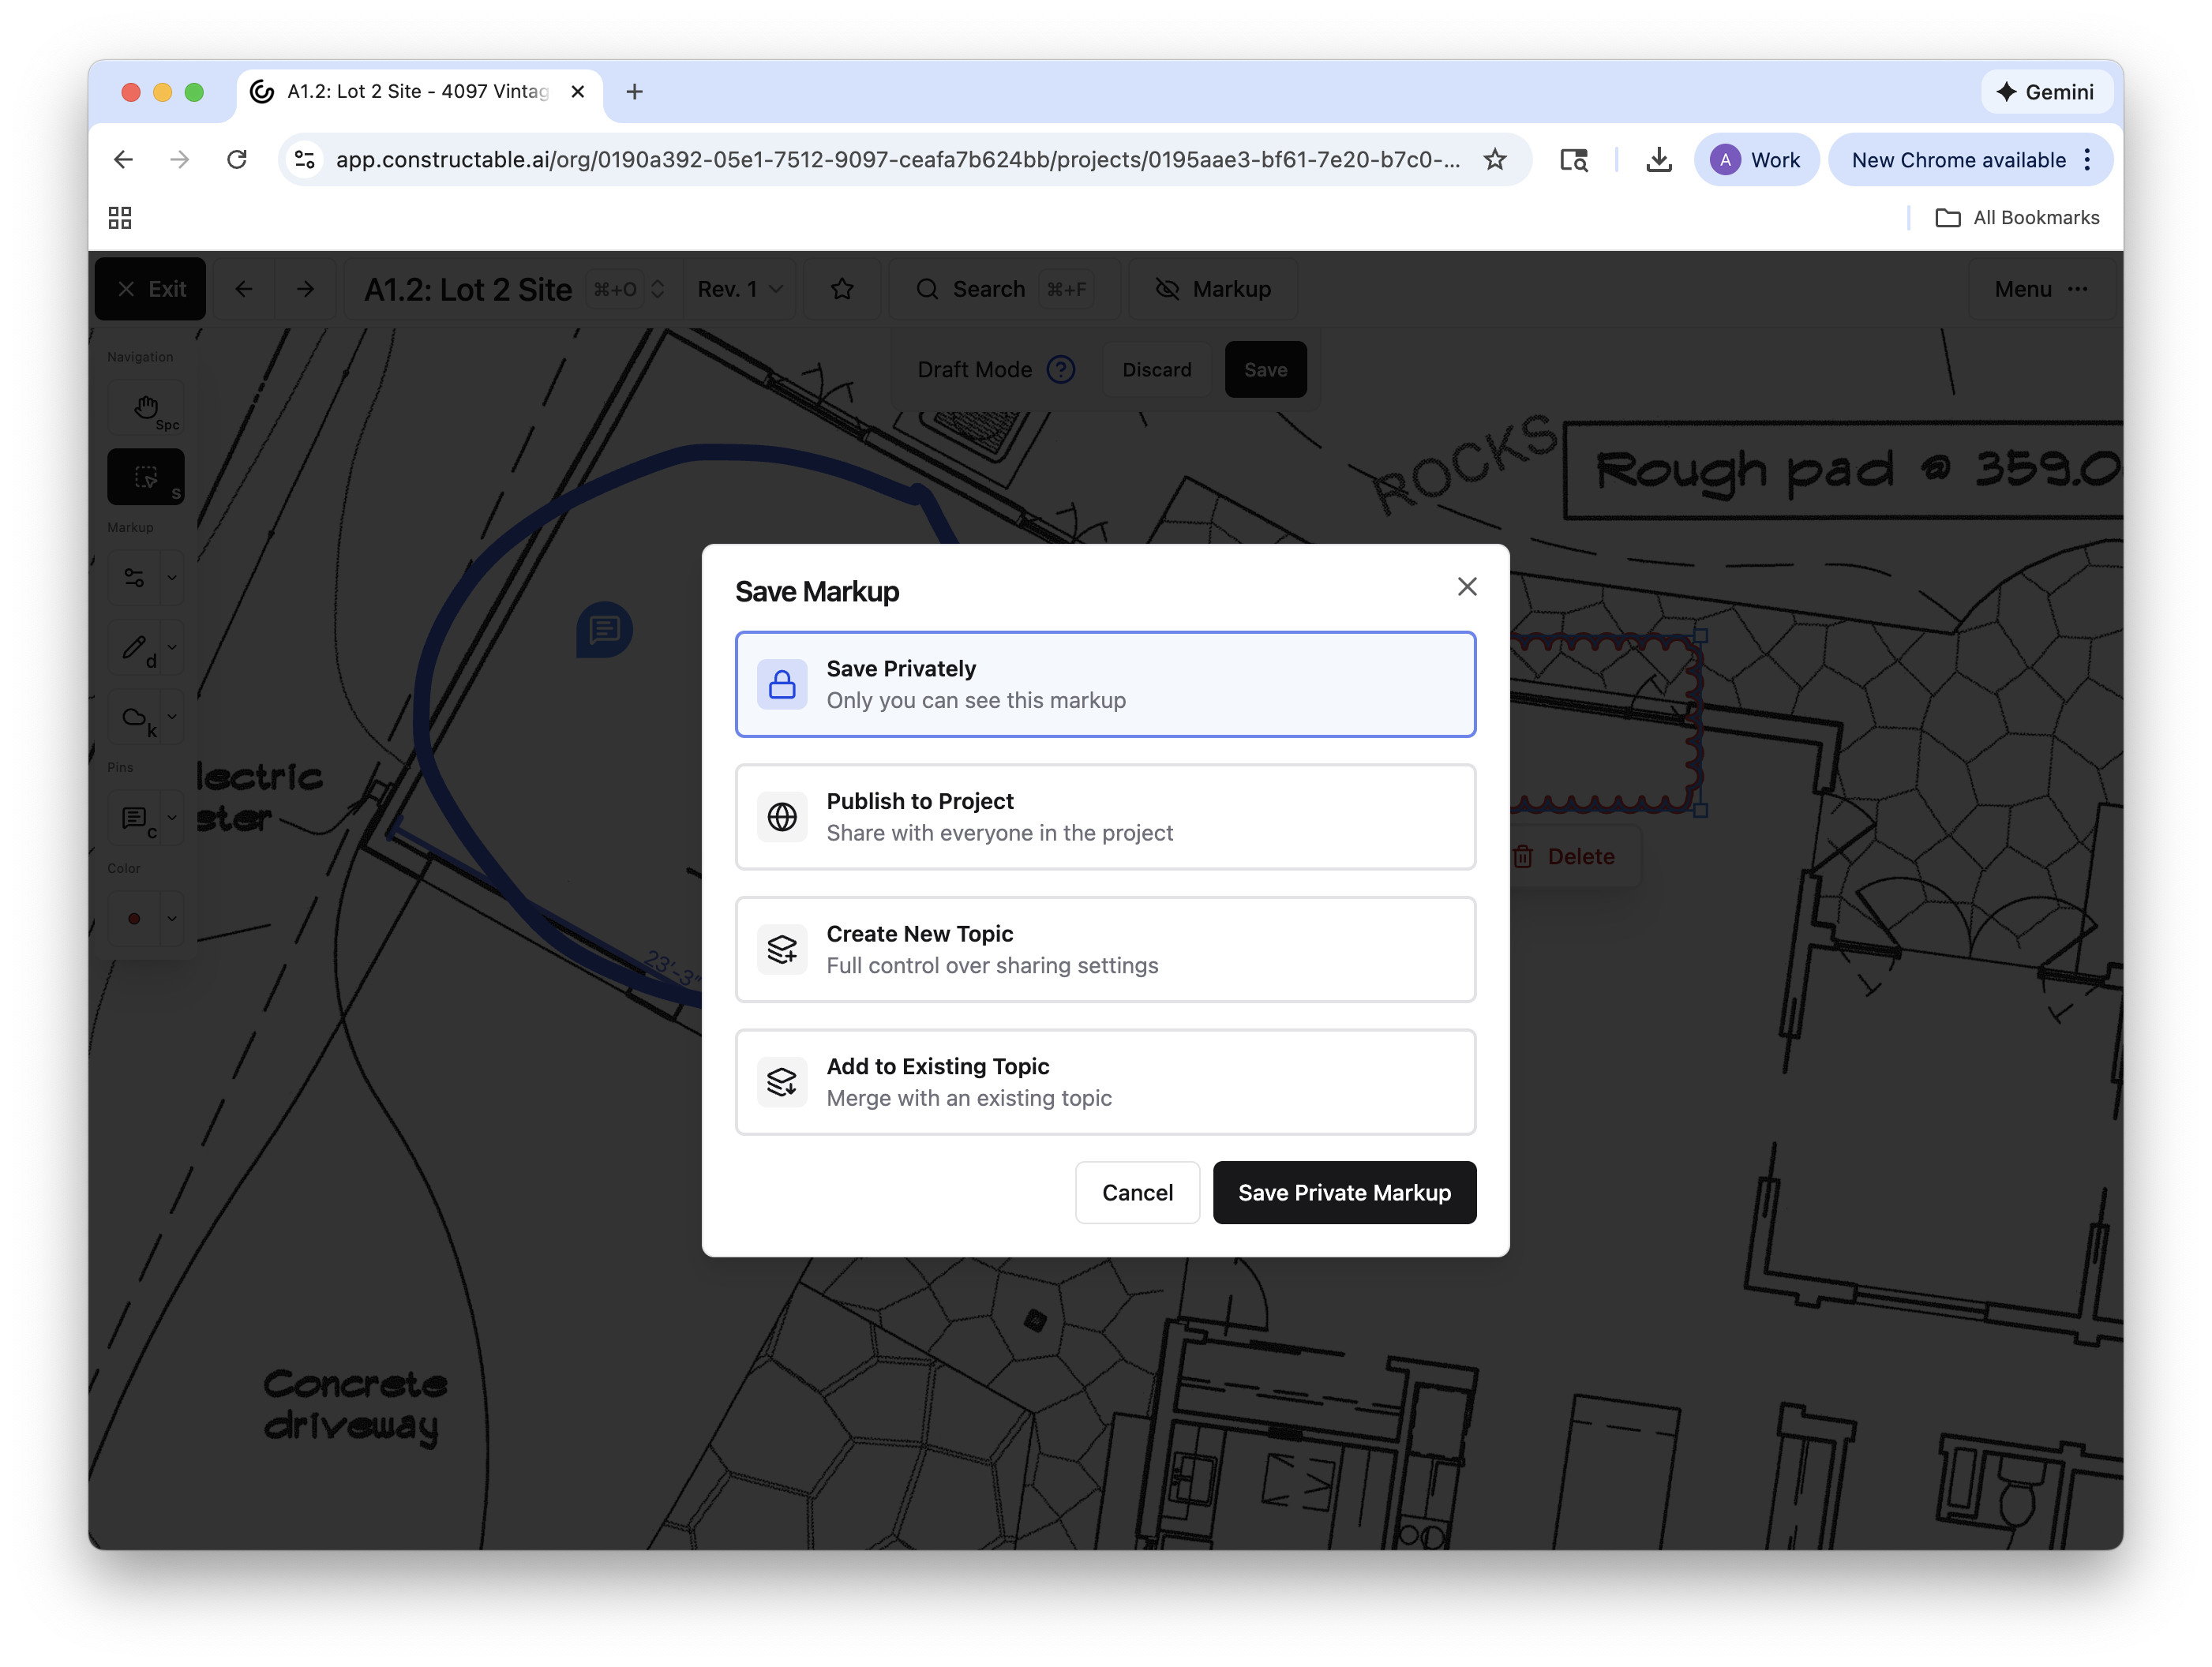
Note: This topic's default title will be: "Your Name's: Private Markup." Change this anytime from the Topics workflow.
Publish to Project: Saving a markup here will create a “Public Markup” topic that everyone in the project will have access to. All markups published to the project will appear under this single topic—streamlined and clutter-free.
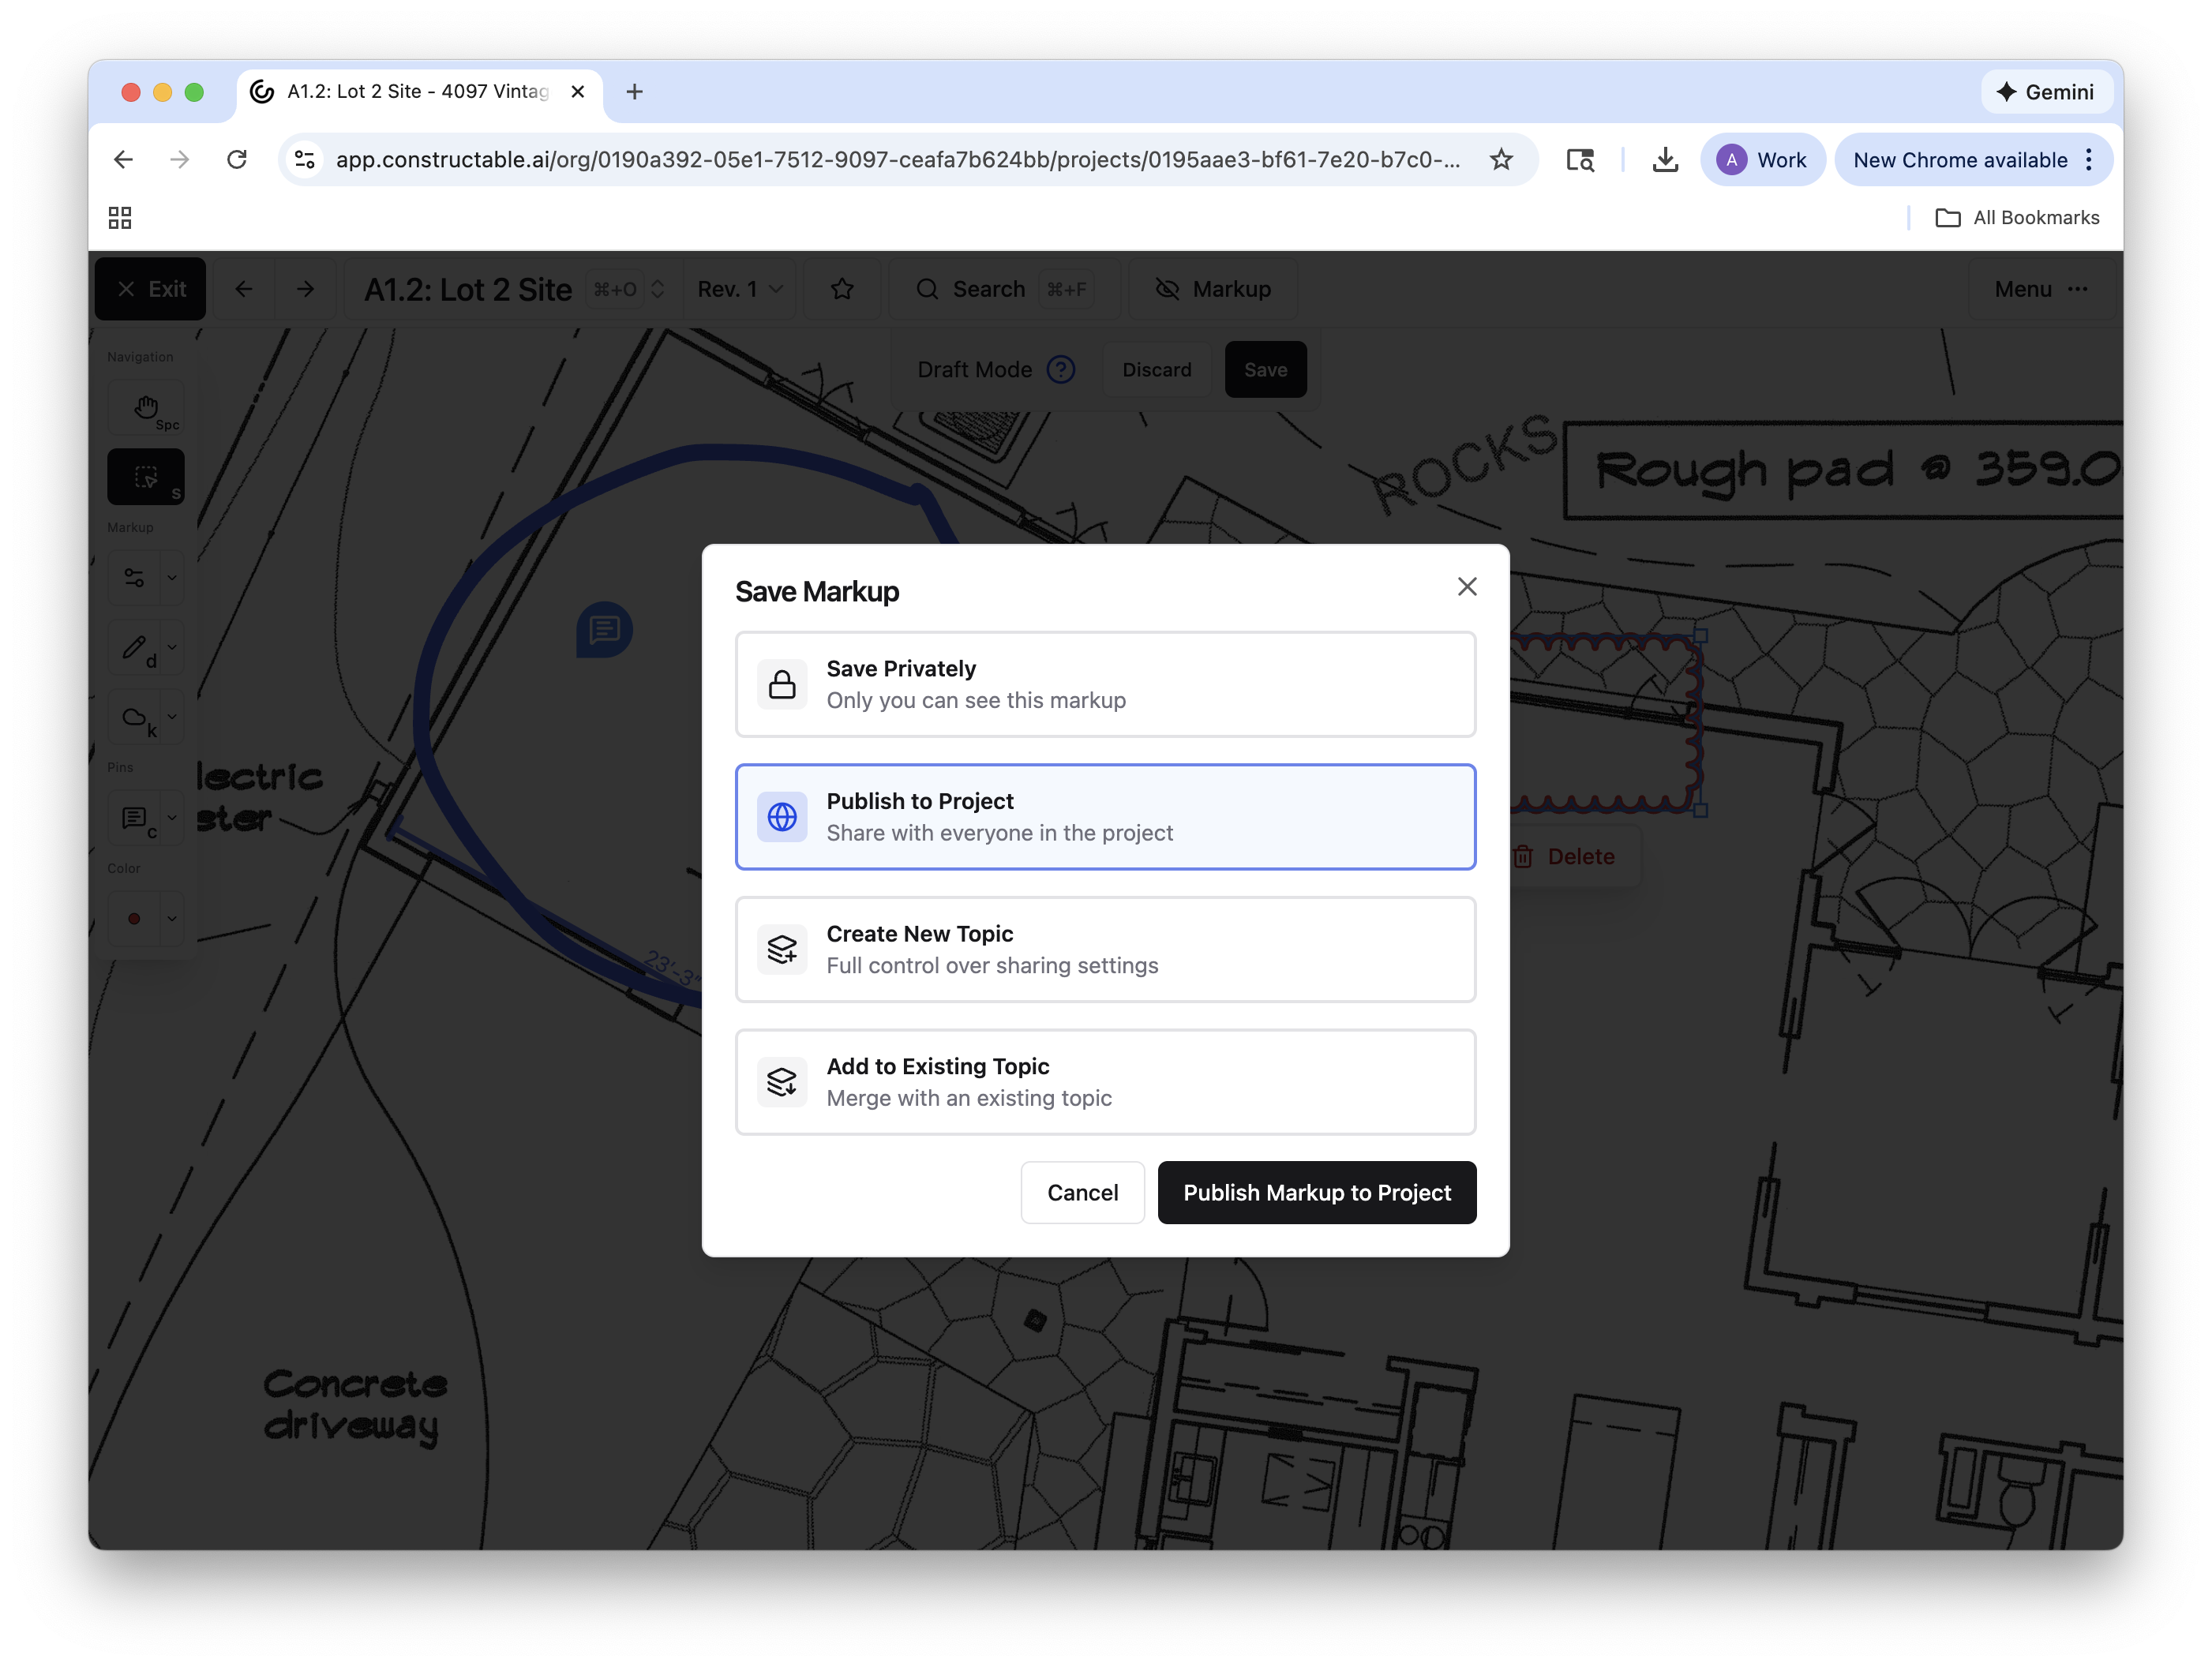
Note: Depending on your permissions, you can change this topic's name, but the default title will be “Public Markup.”
Create New Topic: Just as you would in the Topics workflow, you can create an entirely new topic with its own distinct title and accessibility preferences.
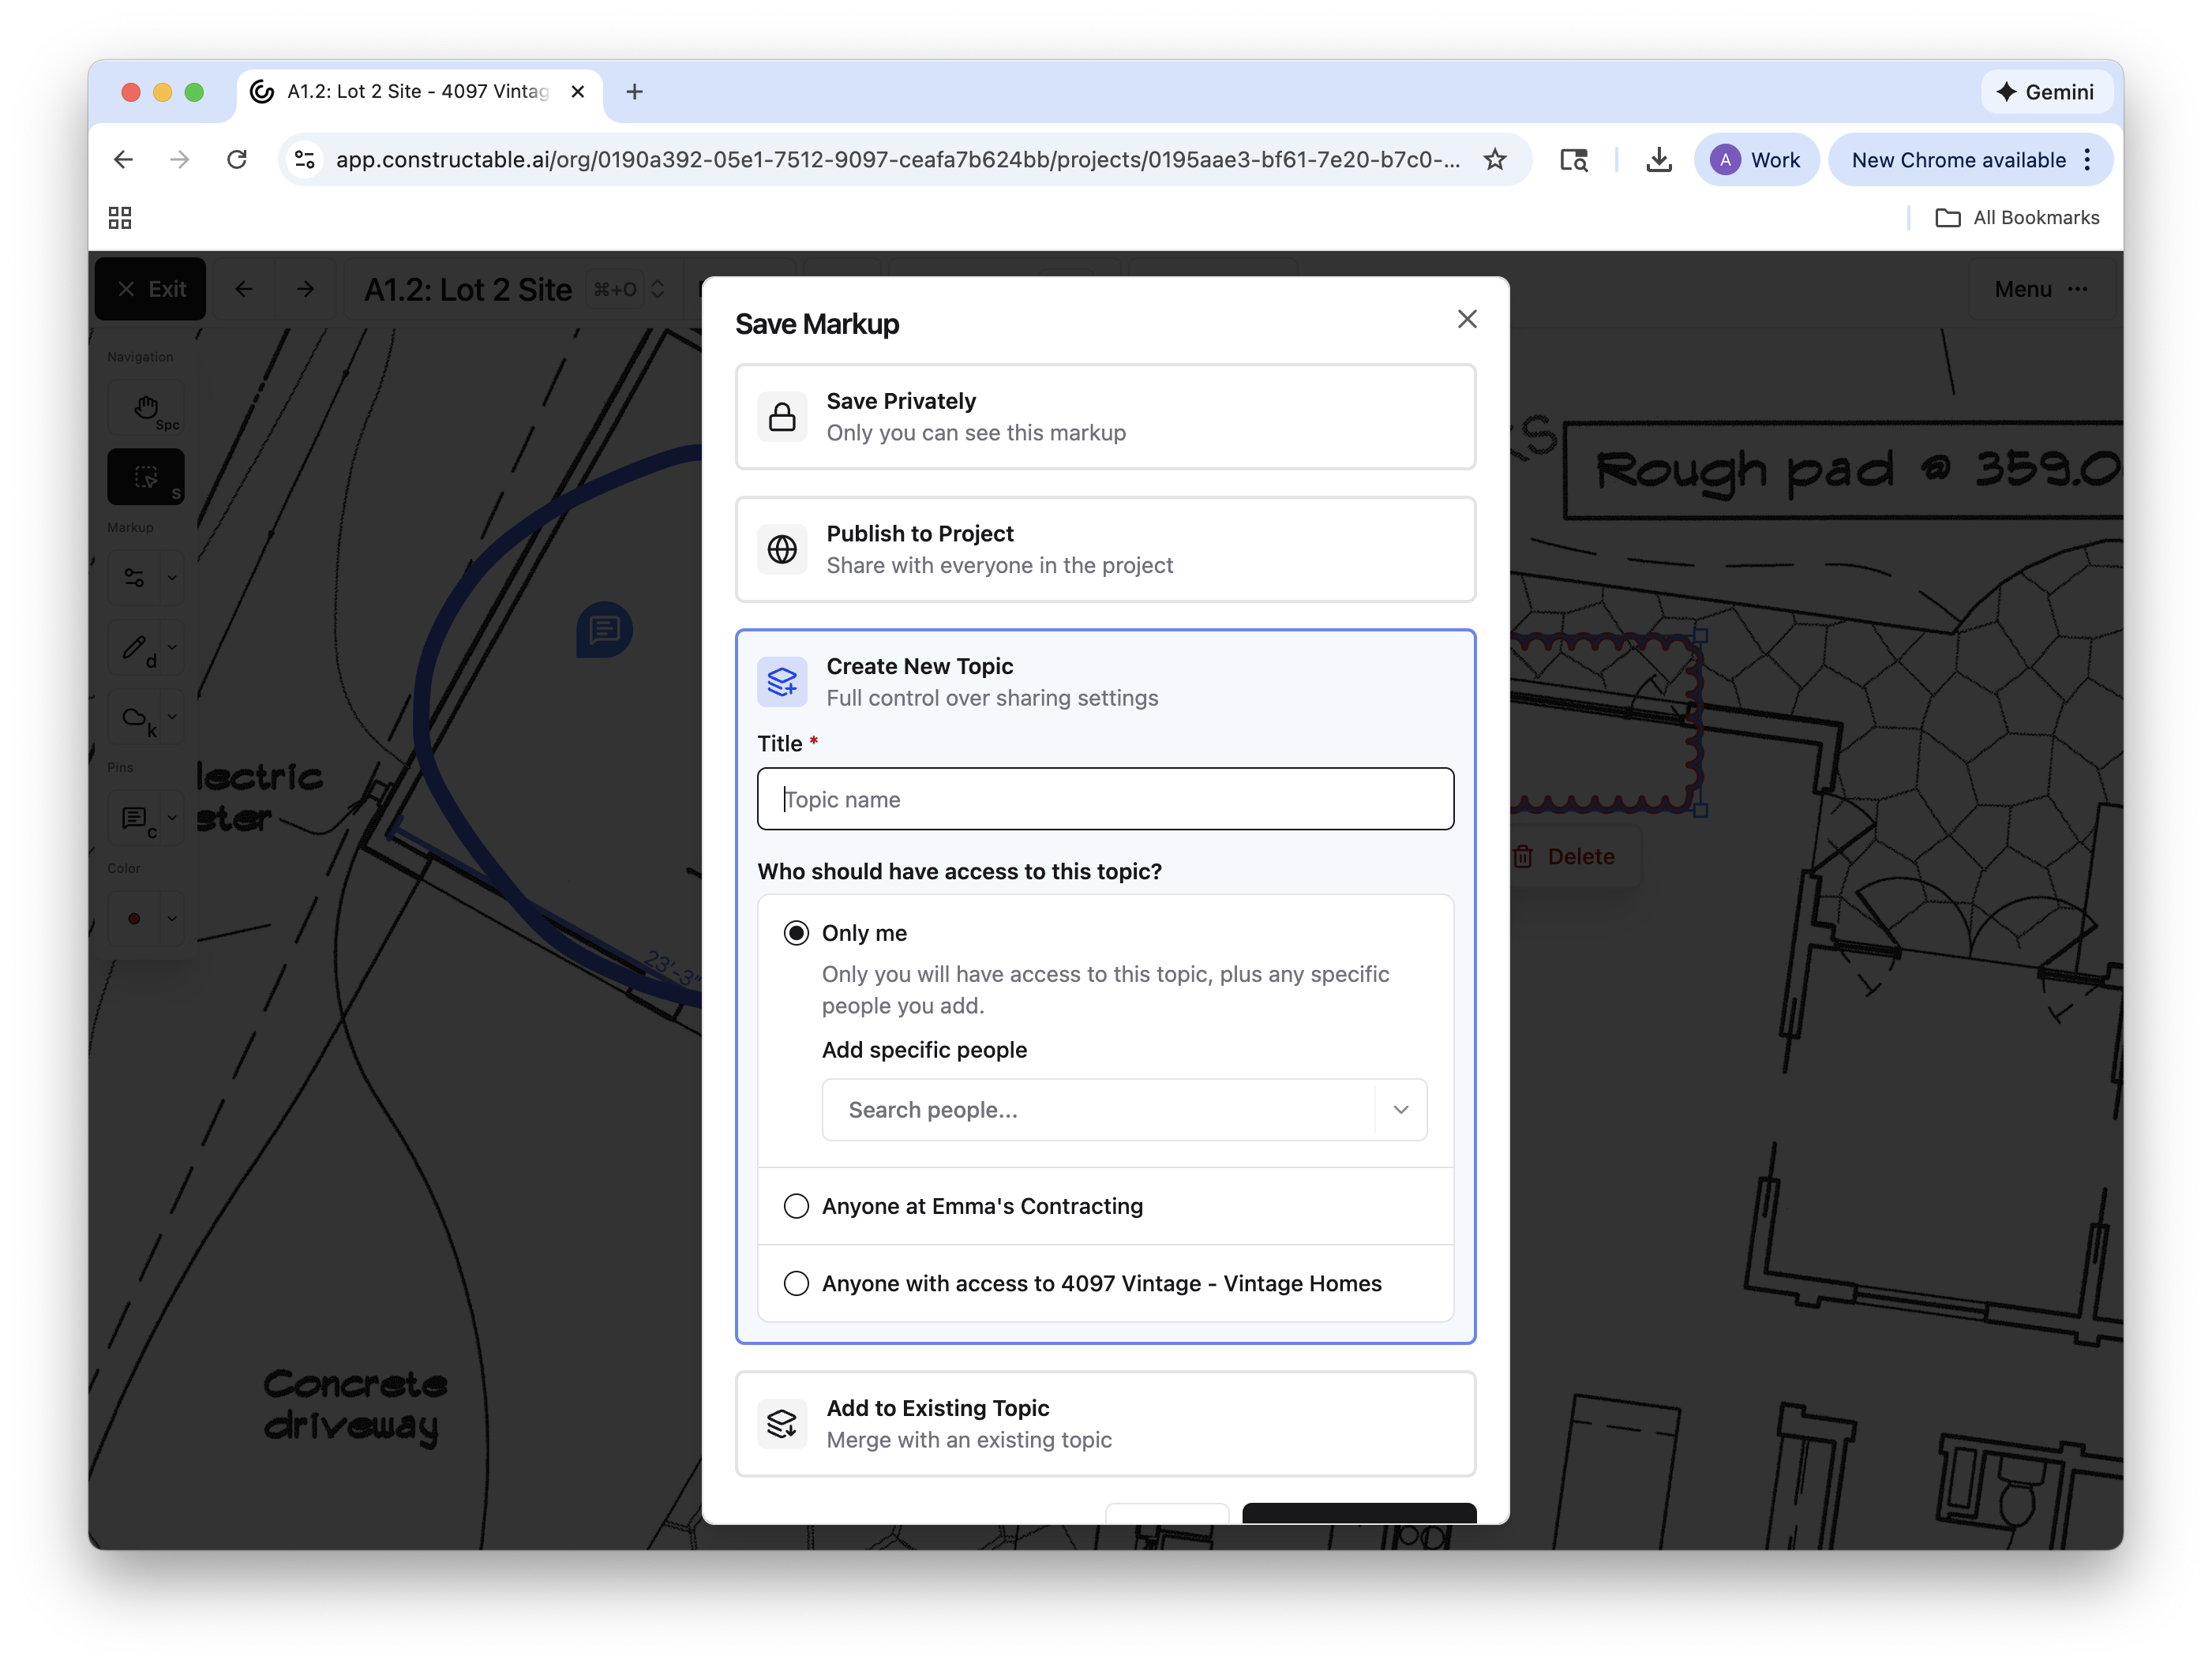
Add to Existing Topic: Select from any existing topic, and your markups will be saved there.
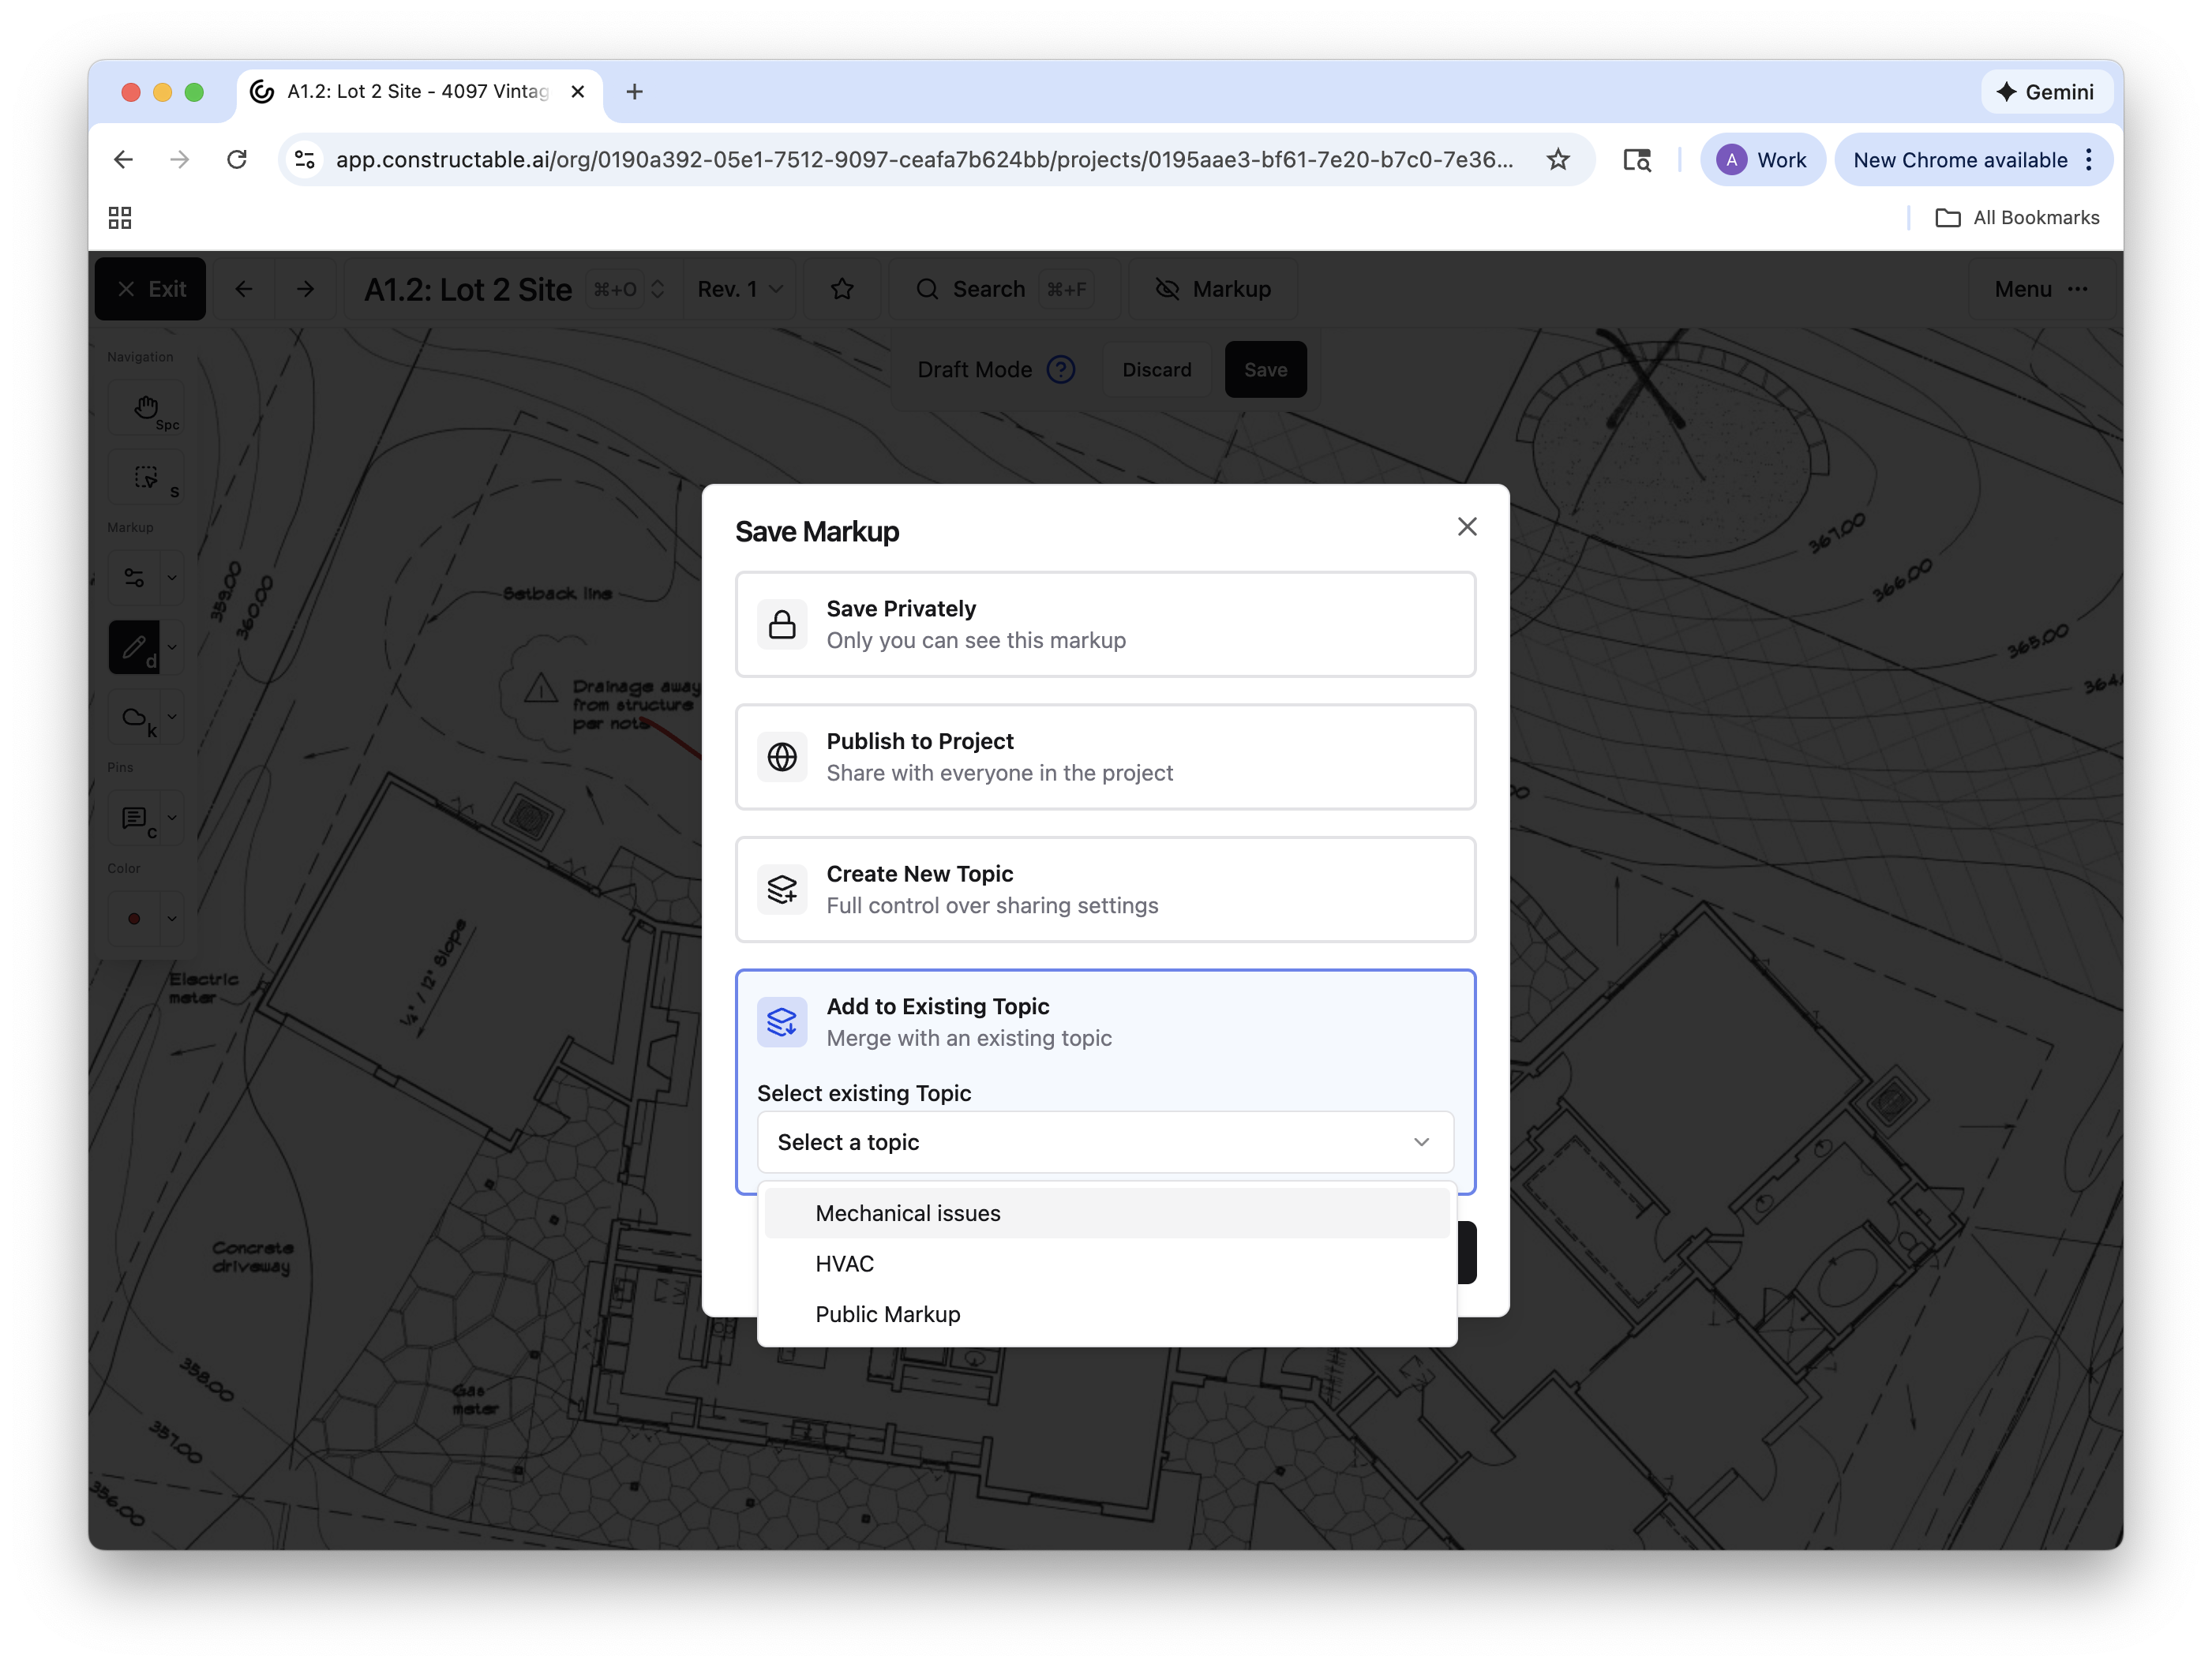
Note: You can only save markups to active topics, not to archived ones. If a topic is archived, you can always un-archive it in the Topics workflow and then add markups to it as you please.
Once you save your markup to a topic, it can be accessed in both the drawing viewer and the Topics workflow.
Drawing Viewer: Topics Menu
Another way to create a new topic in the drawing viewer is to select Menu > Topics > + Create New Topic. Give your new topic a title, then choose who should have access to it. You can select from three options:
Only me and specific people: Select this option, then search and add people that you want to share it with. If you don’t add anyone, you will be the only person with access to the topic you create.
Anyone at my Company: This allows you to share with everyone within your internal team. No one outside of your Company will have access to these topics.
Publish to everyone: Every person with access to the project will be able to view and interact with topics shared this way.
Click Create New Topic, and the topic will save and open automatically.
Adding Markups to Topics in the Drawing Viewer
Once you have a topic created, any markups you make with that topic open will automatically save. (Or as outlined above, you can make a markup while not in a topic, and Save > Add to Existing Topic.) You can see which topic, if any, you have open in the upper-right corner of the drawing viewer. There you will find the topic icon and the blue hyperlink “Topic: Topic Name.”
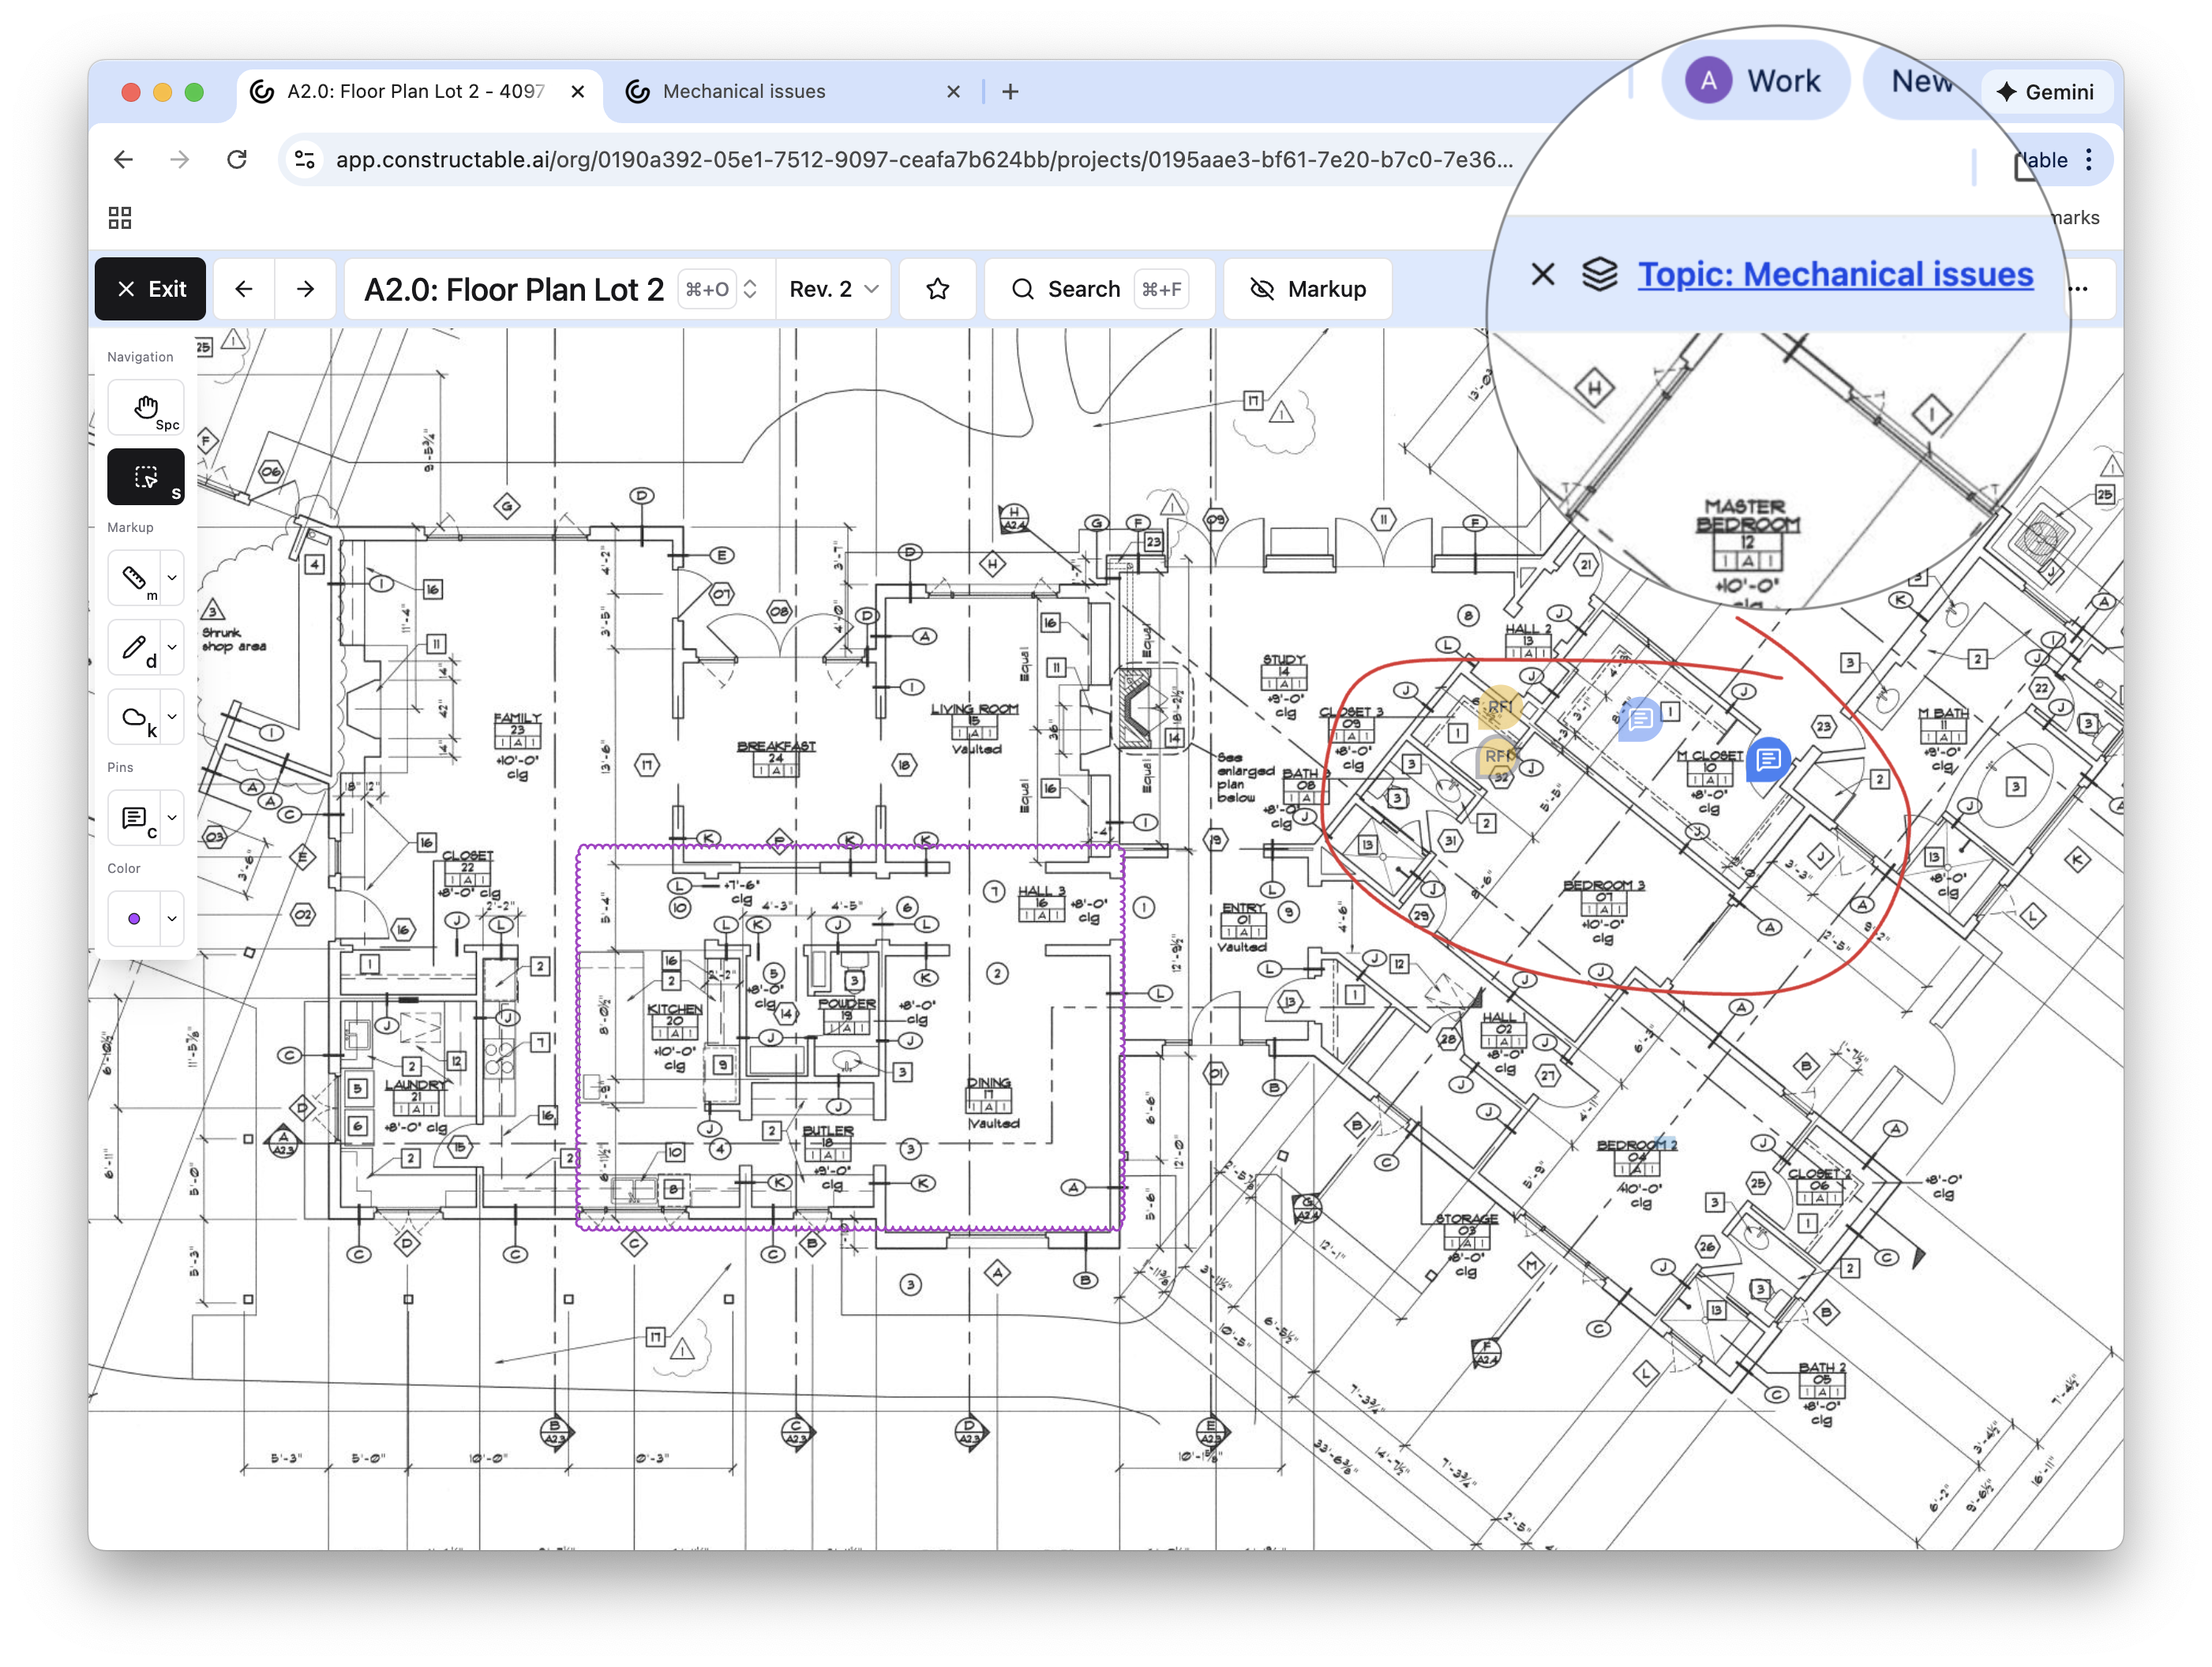
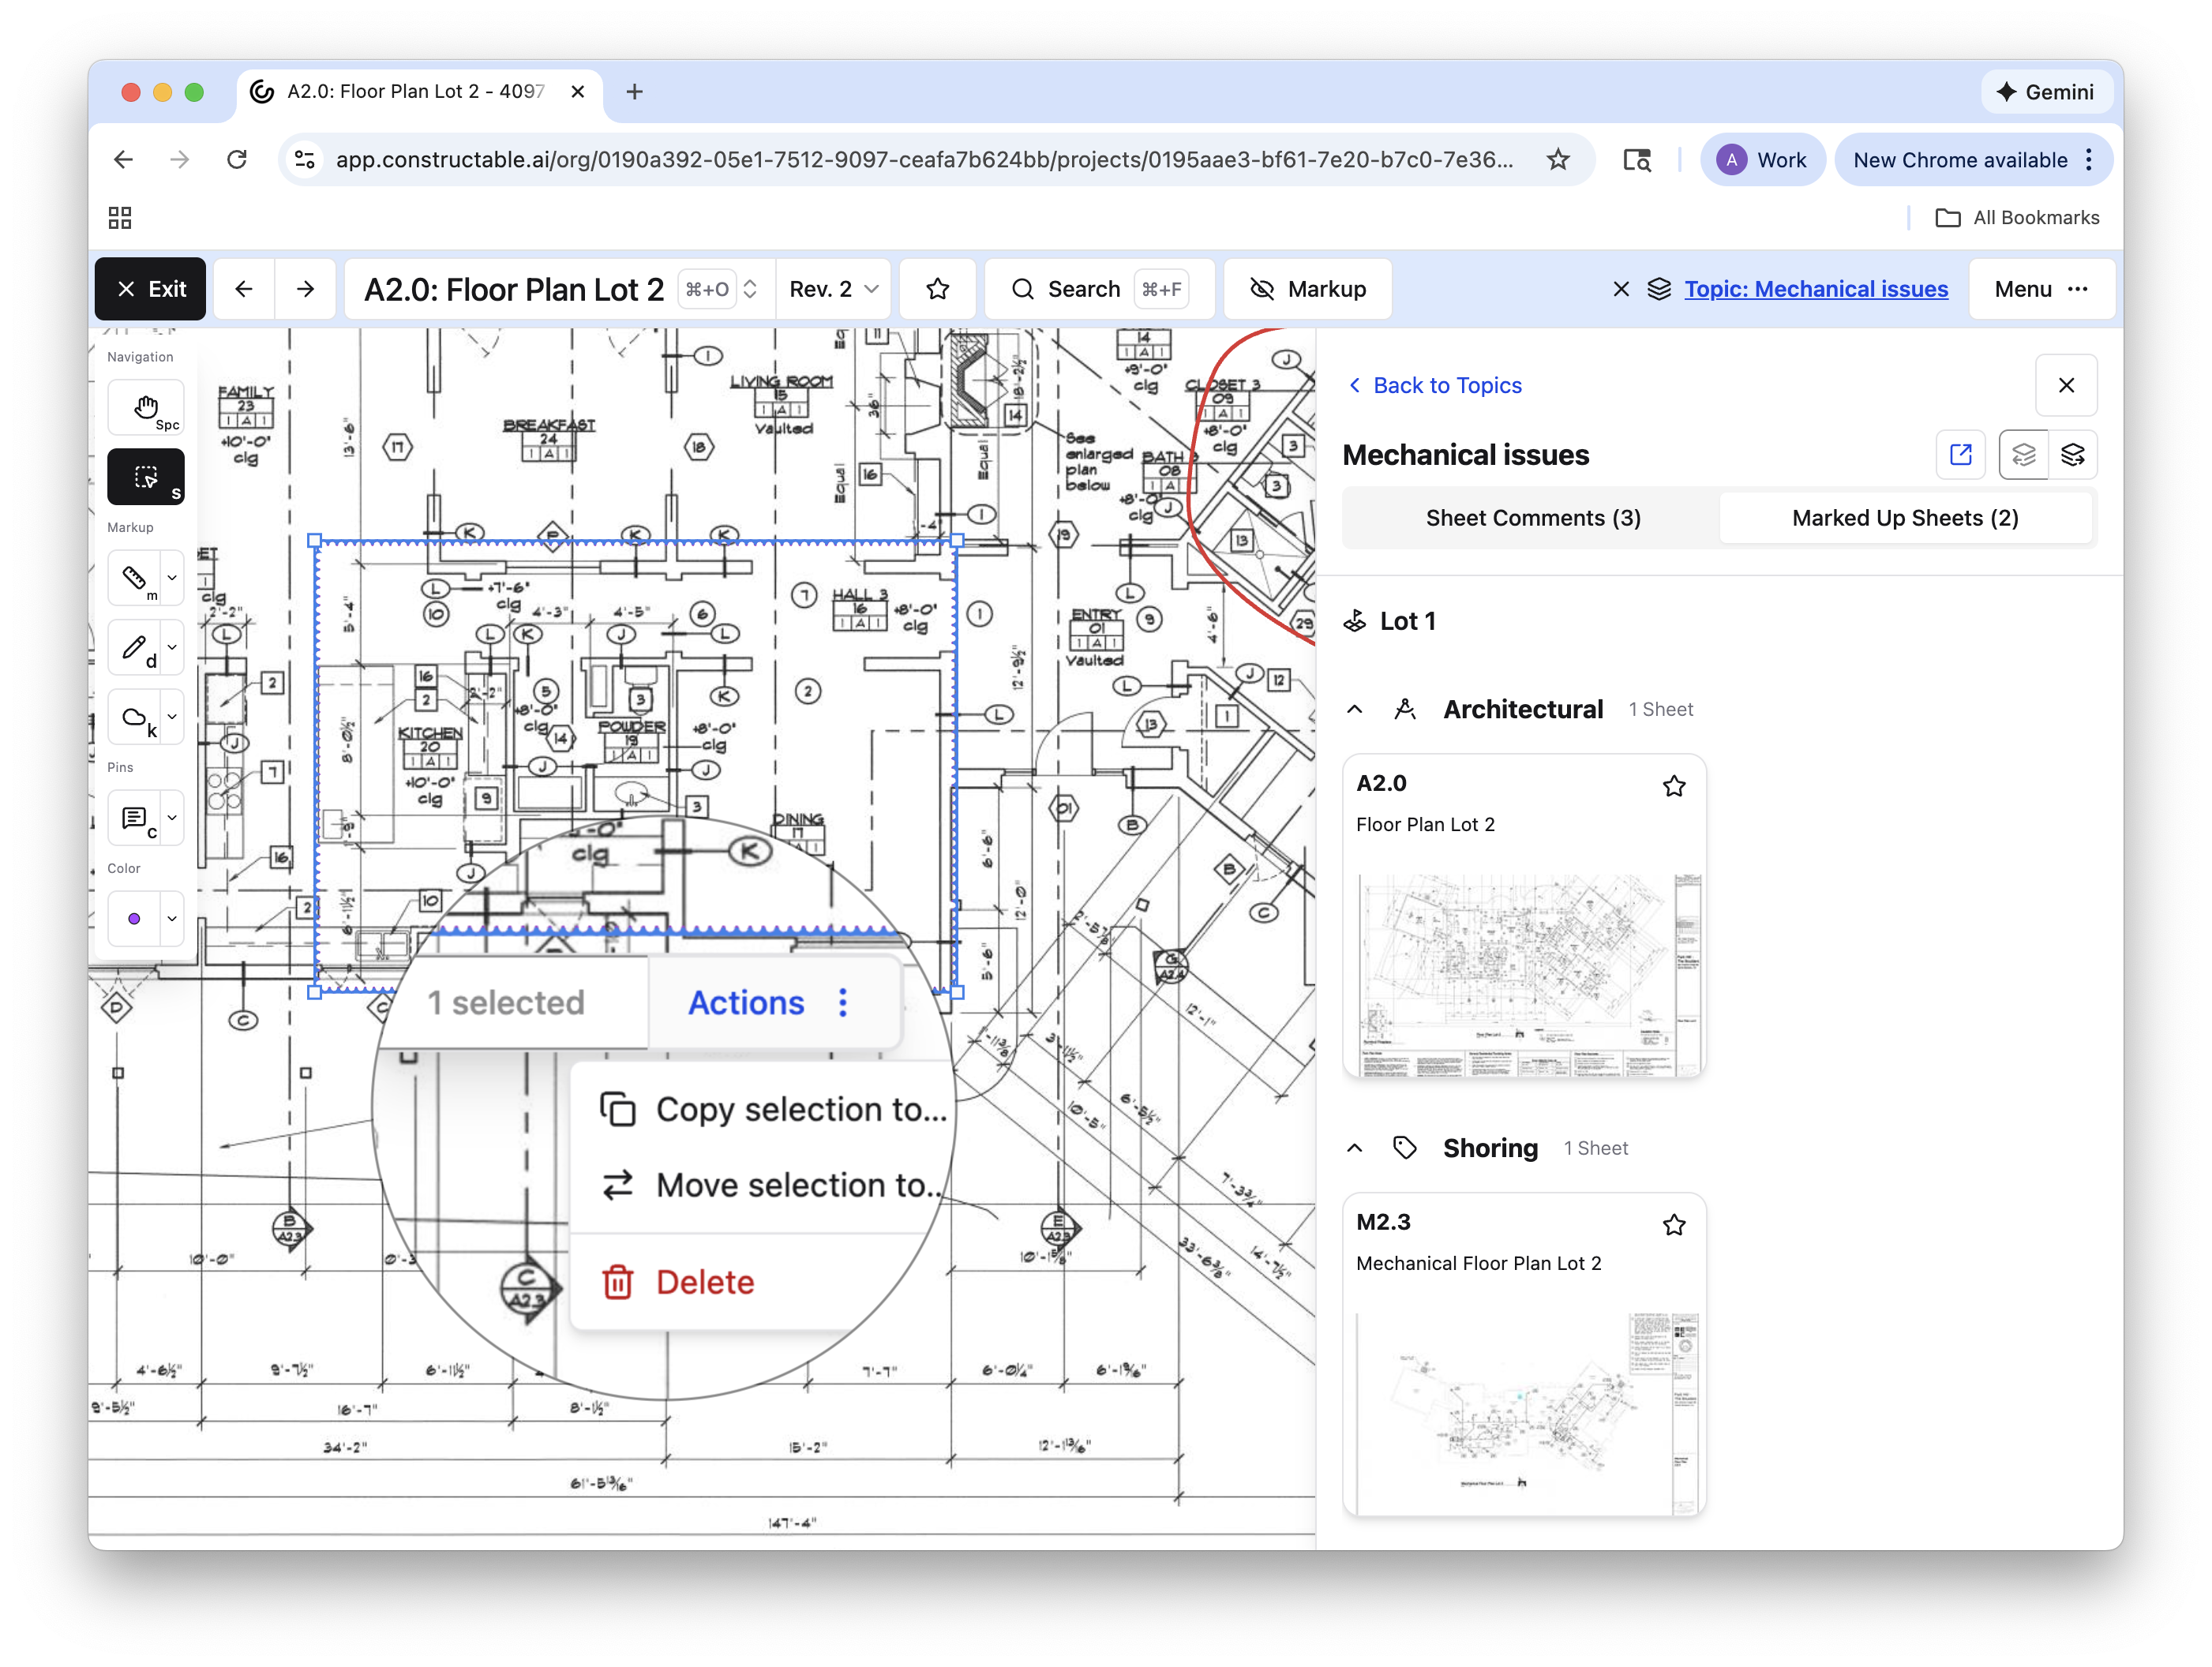
There are a few ways to open a topic while in the drawing viewer. If there are no markups on that sheet yet, click Menu > Topics. This opens the main menu for all topics in the drawing viewer. From here, you can make certain edits and change visibility preferences, as well as open a specific topic. If you open a topic from this menu, you have quick access to all comments, as well as any and all marked up sheets within the topic.
Pro Tip: If there is a long comment thread and you just want the gist of the conversation, toggle on the "Summarize thread contents" switch for a comprehensive summary of the entire comment thread!
If there are already markups for a topic on the sheet, the quickest way to open that topic is to click on a markup—using the select tool—and select Open Topic. Directly next to the Open Topic button is the topic name, so you know which one you're opening. You can easily navigate to other sheets within the same topic from here.
Note: You cannot edit markups saved to a topic unless that topic is open.
If you select a markup, and the option to open the topic doesn't appear, it's likely you already have that topic open. If that is the case, you can select Actions to copy or move the markup to another topic, or delete it.
Quickly navigate to the Topics workflow from the drawing viewer by opening a topic and selecting the Open Topic Page button. This will open that topic within the main workflow in a new tab. You can also do so from the main topic menu by selecting the three dots > Open Topic Page.
Note: The only pin that can be saved to a topic is Comments. RFIs and Quality Lists live in their own workflows that function similarly to topics, but are separate.
Managing Topics
While topics can be accessed from the drawing viewer, the Topics workflow is the central place to manage visibility, organization, and downloads.
From this page, you can view all topics in a project, with active topics listed first and archived topics below. Select View Topic to open a topic’s detail page, where you can review associated sheets and comments, download the topic as a PDF, rename it, update sharing and notification settings, archive it, or open it directly in the drawing viewer.
Topic Overview Page
This view gives you quick access to all sheets attached to the topic, across drawing areas, as well as edit access to the topic.
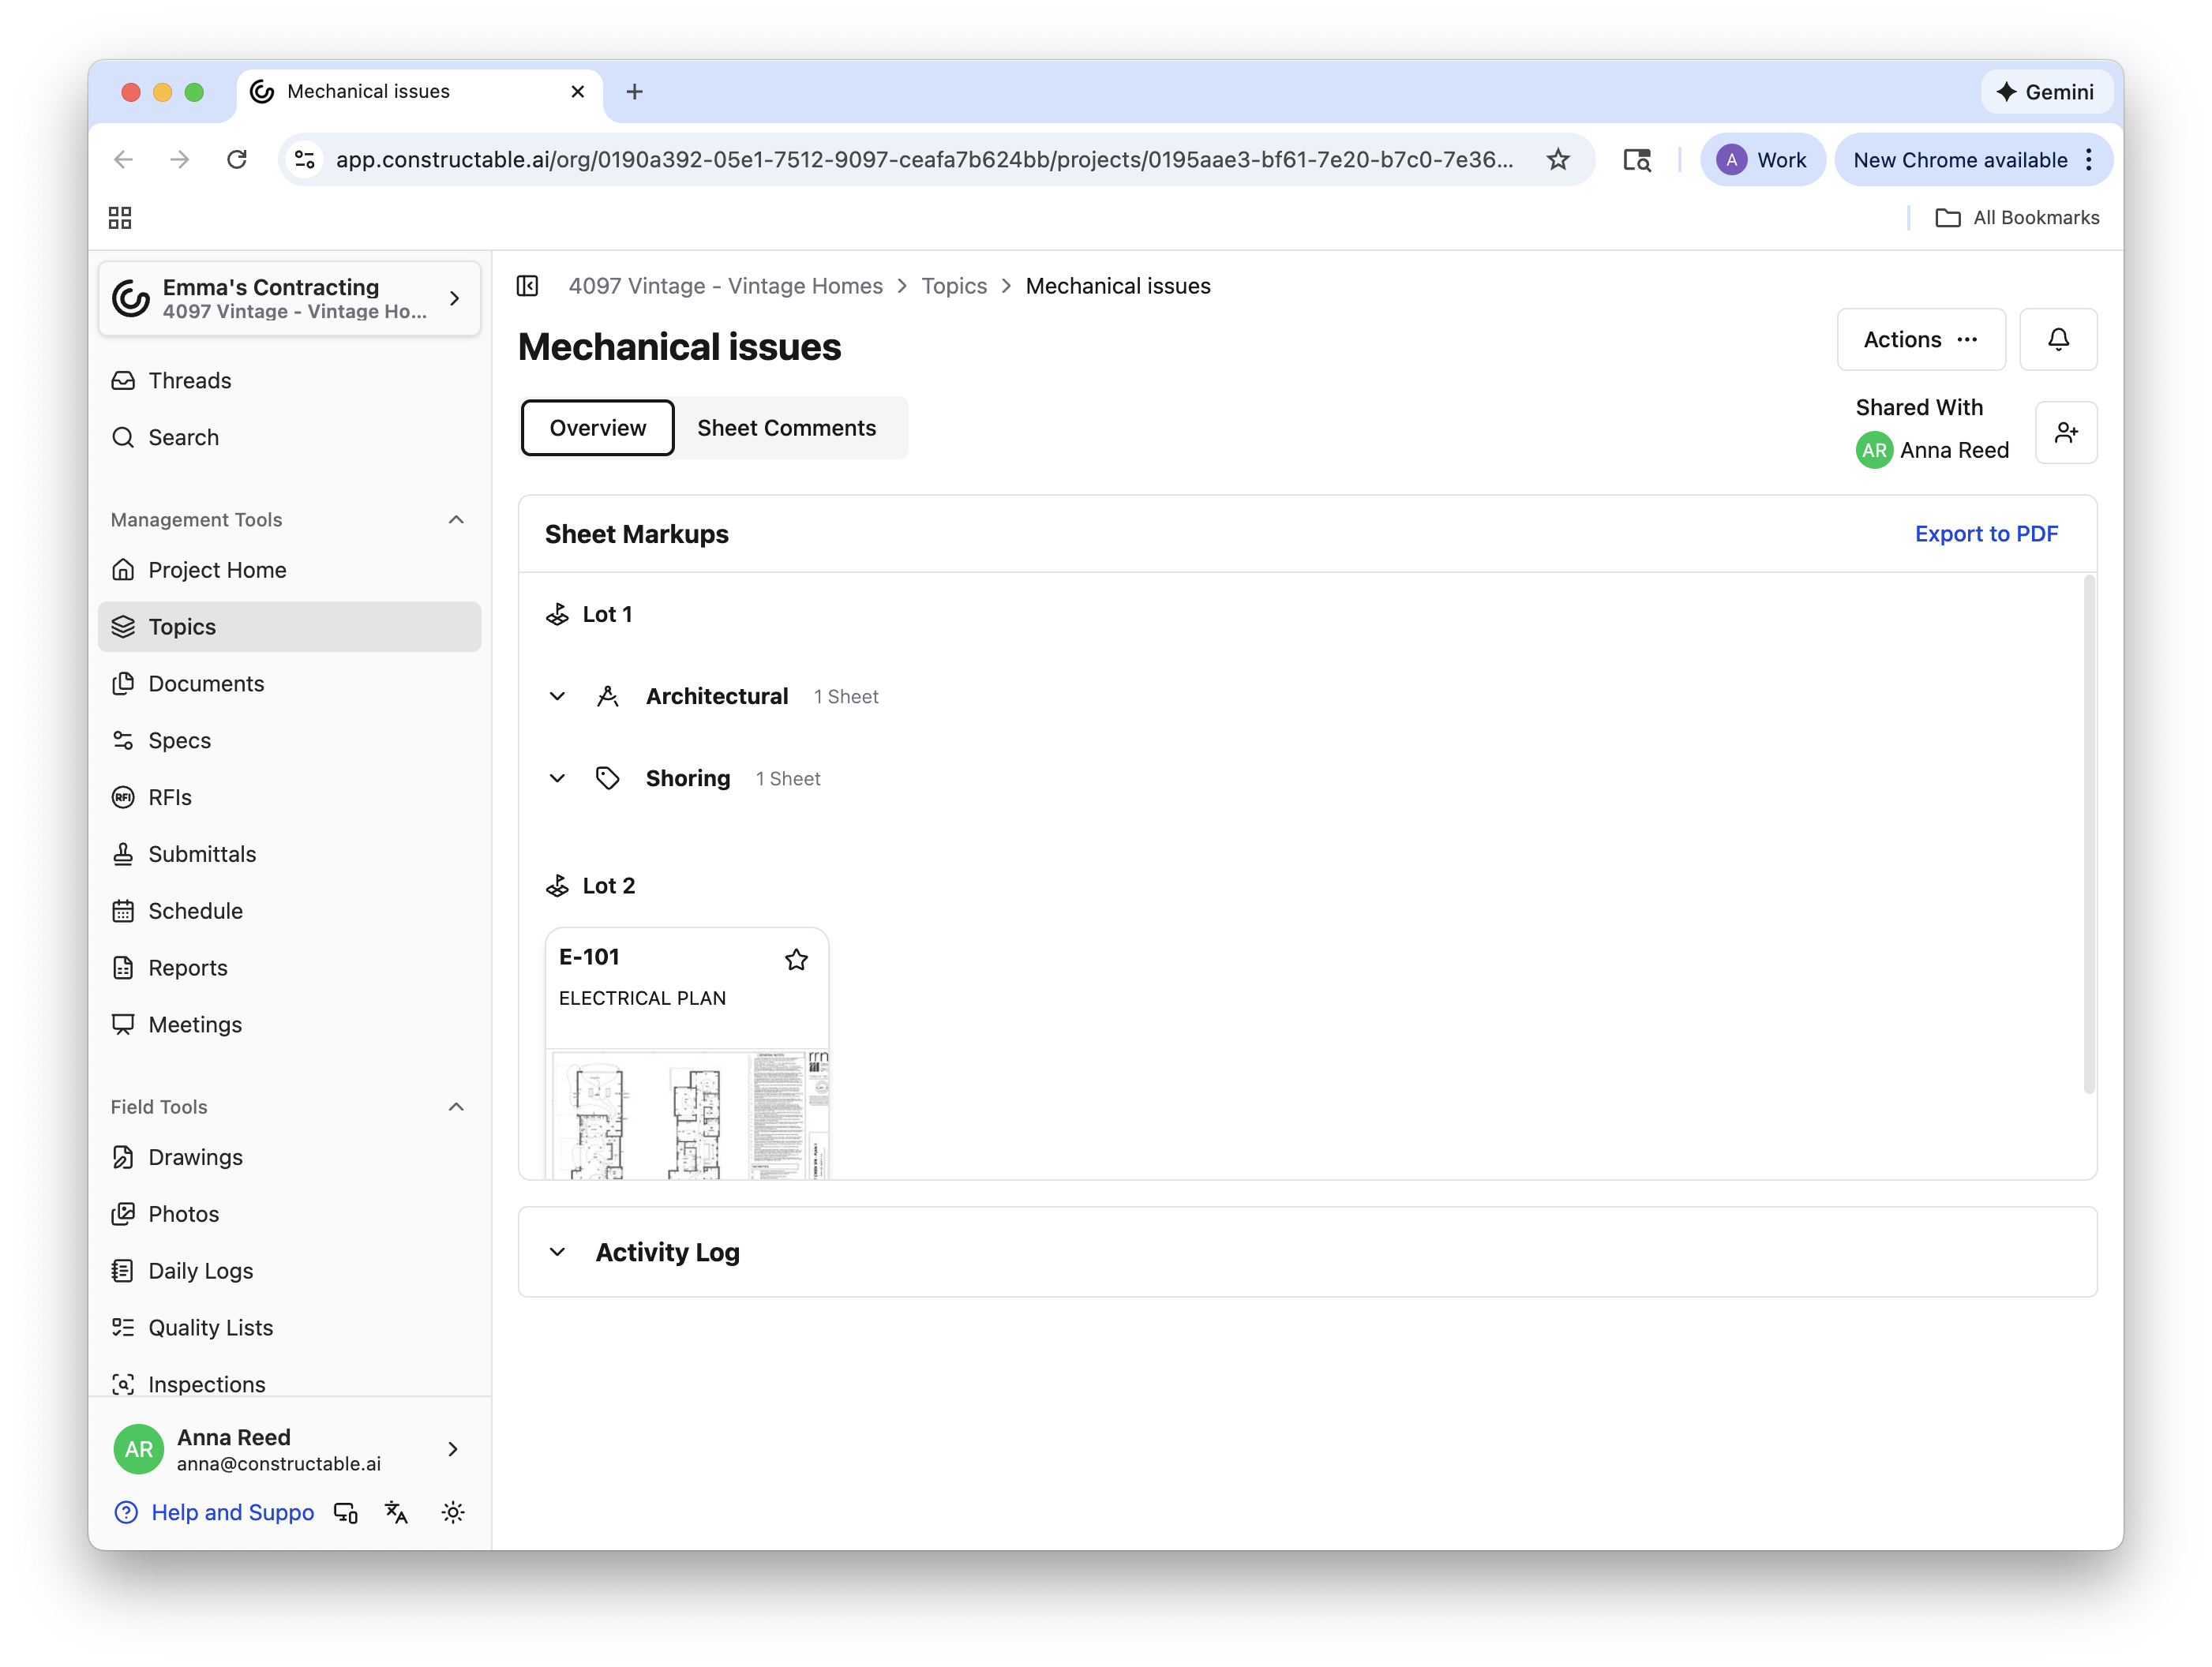
To rename the topic, click Actions > Rename Topic, type in the new title, and select Save. To update who has access to the topic, click the add person icon in the upper right, or click Actions > Edit Shared With. Make your selection of people to share with or un-share with, then click Save.
Also, from the Actions drop-down menu, Archive an outdated or resolved topic or Open in Drawing Viewer. If you do open in the drawing viewer from this button, it will open the first sheet in the topic. If you want to open a different sheet, simply select from the list under the "Sheet Markups" menu.
This menu organizes sheets by drawing area and then alphabetizes them by discipline. To download all sheets related to a topic, click Export to PDF. All markups made within the topic will be downloaded directly on the sheet, with each sheet receiving its own page in the PDF.
Note: A pinned comment will not appear on the downloaded sheet. All other markups—drawings, text, measurements, etc—will be visible on the downloaded PDF. To find the comments, you must open the Sheet Comments tab from the topic page.
Sheet Comments Page
The sheet comments menu lets you get a comprehensive overview of all comments within a topic across sheets and drawing areas.
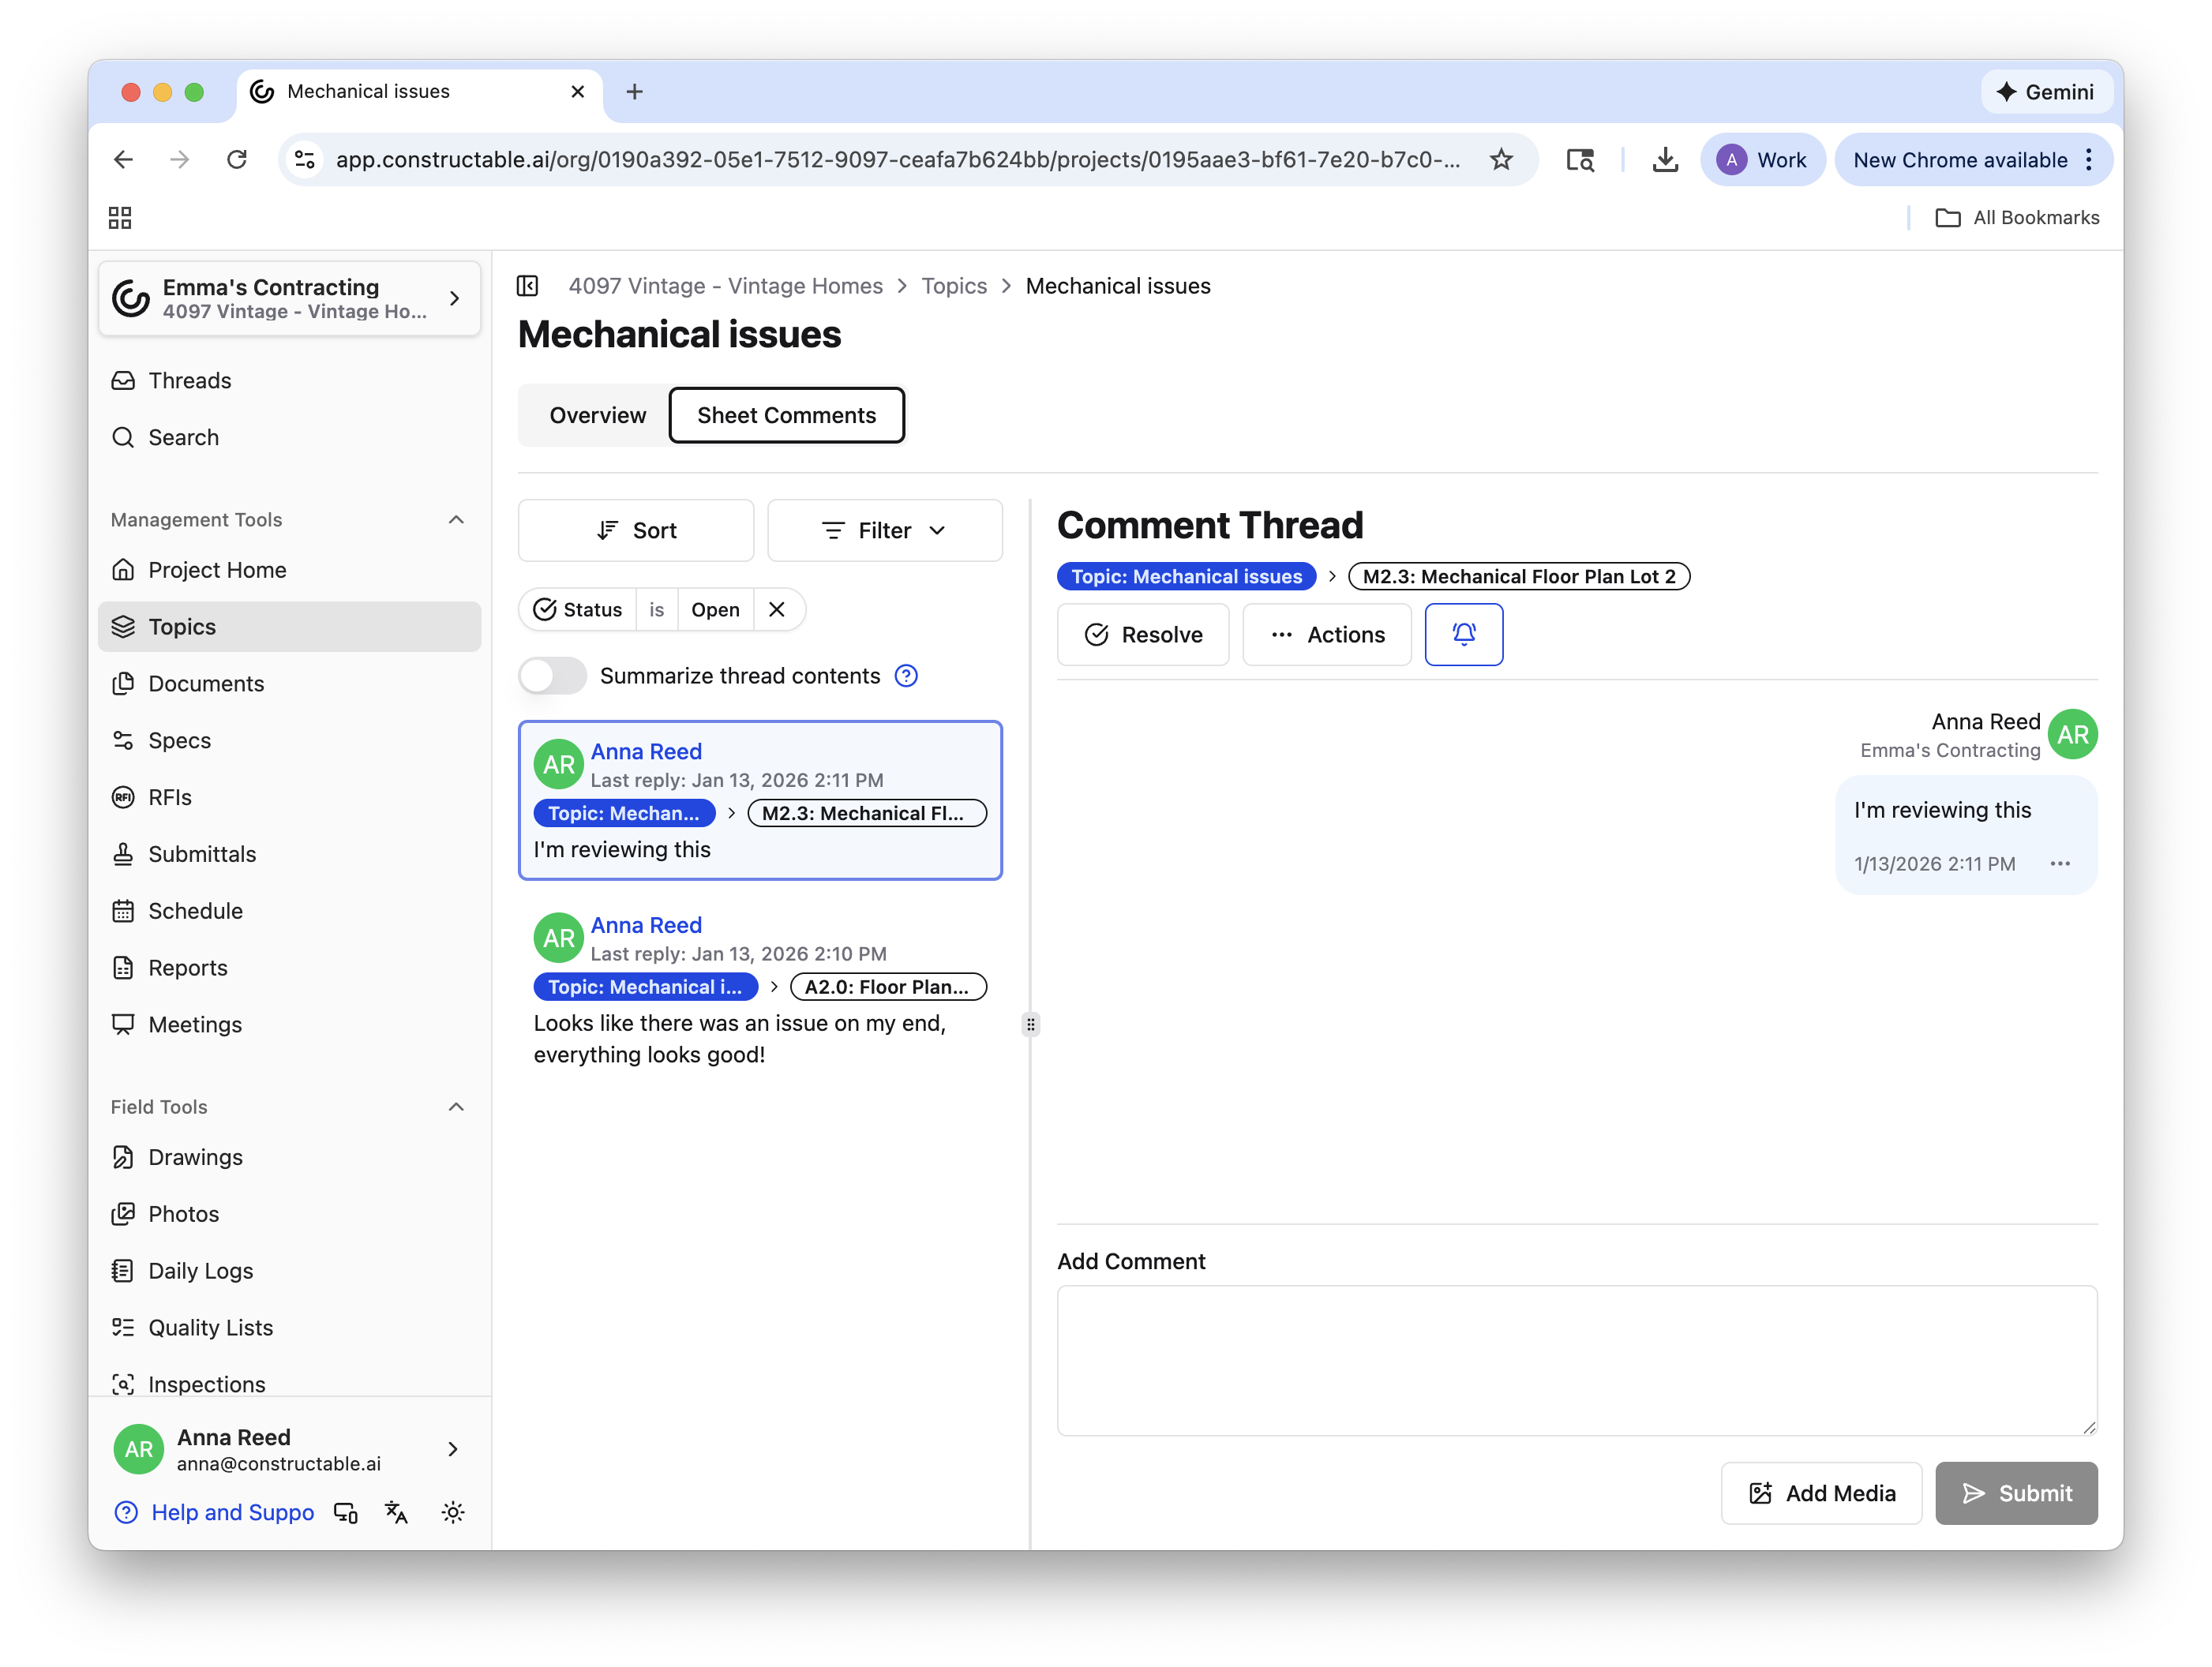
From this page, you can sort, filter, respond to, and resolve any and all comment threads specific to that particular topic. This is what differentiates this page from the Threads workflow: all comments are relevant to the open topic.
Note: If your edit and save options look different from the ones in this article, it may be related to your role permissions. All users with access to a project can save markups to a personal topic, but the rest depends on your organization’s usage and permissions. Learn more here: 📄 Roles and Permissions
And that’s it! Topics act as flexible containers that help teams organize, share, and manage drawing feedback across a project.
Frequently Asked Questions
What is the difference between a topic and a markup?
A markup is a single annotation on a drawing (text, shape, measurement, etc.). A topic is a container that can hold multiple markups and comment threads across one or more sheets.
Do I have to create a topic before adding markups?
No. You can add markups in Draft Mode and decide later whether to discard them, save them privately, or add them to a new or existing topic.
Can I move markups between topics?
Yes. With a topic open, select a markup and use Actions to copy or move it to another active topic.
Why can't I edit a markup?
Markups saved to a topic can only be edited when that topic is open. If you don’t see editing options, open the topic associated with that markup first. If you open the correct topic and still cannot edit the markup, it is likely because you do not have the proper permissions.
What's the difference between "Save Privately" and creating a private topic?
Saving privately places markups into a personal topic that only you can see—you cannot share it with others. Creating a private topic gives you control over exactly who can access it and allows you to share it later if needed.